Tutorial (30m)
On this page
- Setup
- The Root Route
- Adding Stylesheets with
links - The Contact Route UI
- Nested Routes and Outlets
- Client Side Routing
- Loading Data
- Type Inference
- URL Params in Loaders
- Validating Params and Throwing Responses
- Data Mutations
- Creating Contacts
- Updating Data
- Updating Contacts with
FormData - Mutation Discussion
- Redirecting new records to the edit page
- Active Link Styling
- Global Pending UI
- Deleting Records
- Index Routes
- Cancel Button
URLSearchParamsandGETSubmissions- Synchronizing URLs to Form State
- Submitting
Form'sonChange - Adding Search Spinner
- Managing the History Stack
Forms Without Navigation- Optimistic UI
Remix Tutorial
We'll be building a small, but feature-rich app that lets you keep track of your contacts. There's no database or other "production ready" things, so we can stay focused on Remix. We expect it to take about 30 m if you're following along, otherwise it's a quick read.
👉 Every time you see this, it means you need to do something in the app!
The rest is just there for your information and deeper understanding. Let's get to it.
Setup
👉 Generate a basic template
npx create-remix@latest --template remix-run/remix/templates/remix-tutorial
This uses a pretty bare-bones template but includes our CSS and data model, so we can focus on Remix. The Quick Start can familiarize you with the basic setup of a Remix project if you'd like to learn more.
👉 Start the app
# cd into the app directory
cd {wherever you put the app}

# install dependencies if you haven't already
npm install

# start the server
npm run dev
You should be able to open up http://localhost:5173 and see an unstyled screen that looks like this:
The Root Route
Note the file at app/root.tsx. This is what we call the "Root Route". It's the first component in the UI that renders, so it typically contains the global layout for the page.
Expand here to see the root component code
import {
  Form,
  Links,
  Meta,
  Scripts,
  ScrollRestoration,
} from "@remix-run/react";

export default function App() {
  return (
    <html lang="en">
      <head>
        <meta charSet="utf-8" />
        <meta
          name="viewport"
          content="width=device-width, initial-scale=1"
        />
        <Meta />
        <Links />
      </head>
      <body>
        <div id="sidebar">
          <h1>Remix Contacts</h1>
          <div>
            <Form id="search-form" role="search">
              <input
                aria-label="Search contacts"
                id="q"
                name="q"
                placeholder="Search"
                type="search"
              />
              <div
                aria-hidden
                hidden={true}
                id="search-spinner"
              />
            </Form>
            <Form method="post">
              <button type="submit">New</button>
            </Form>
          </div>
          <nav>
            <ul>
              <li>
                <a href={`/contacts/1`}>Your Name</a>
              </li>
              <li>
                <a href={`/contacts/2`}>Your Friend</a>
              </li>
            </ul>
          </nav>
        </div>

        <ScrollRestoration />
        <Scripts />
      </body>
    </html>
  );
}
Adding Stylesheets with links
While there are multiple ways to style your Remix app, we're going to use a plain stylesheet that's already been written to keep things focused on Remix.
You can import CSS files directly into JavaScript modules. Vite will fingerprint the asset, save it to your build's client directory, and provide your module with the publicly accessible href.
👉 Import the app styles
import type { LinksFunction } from "@remix-run/node";
// existing imports

import appStylesHref from "./app.css?url";

export const links: LinksFunction = () => [
  { rel: "stylesheet", href: appStylesHref },
];
Every route can export a links function. They will be collected and rendered into the <Links /> component we rendered in app/root.tsx.
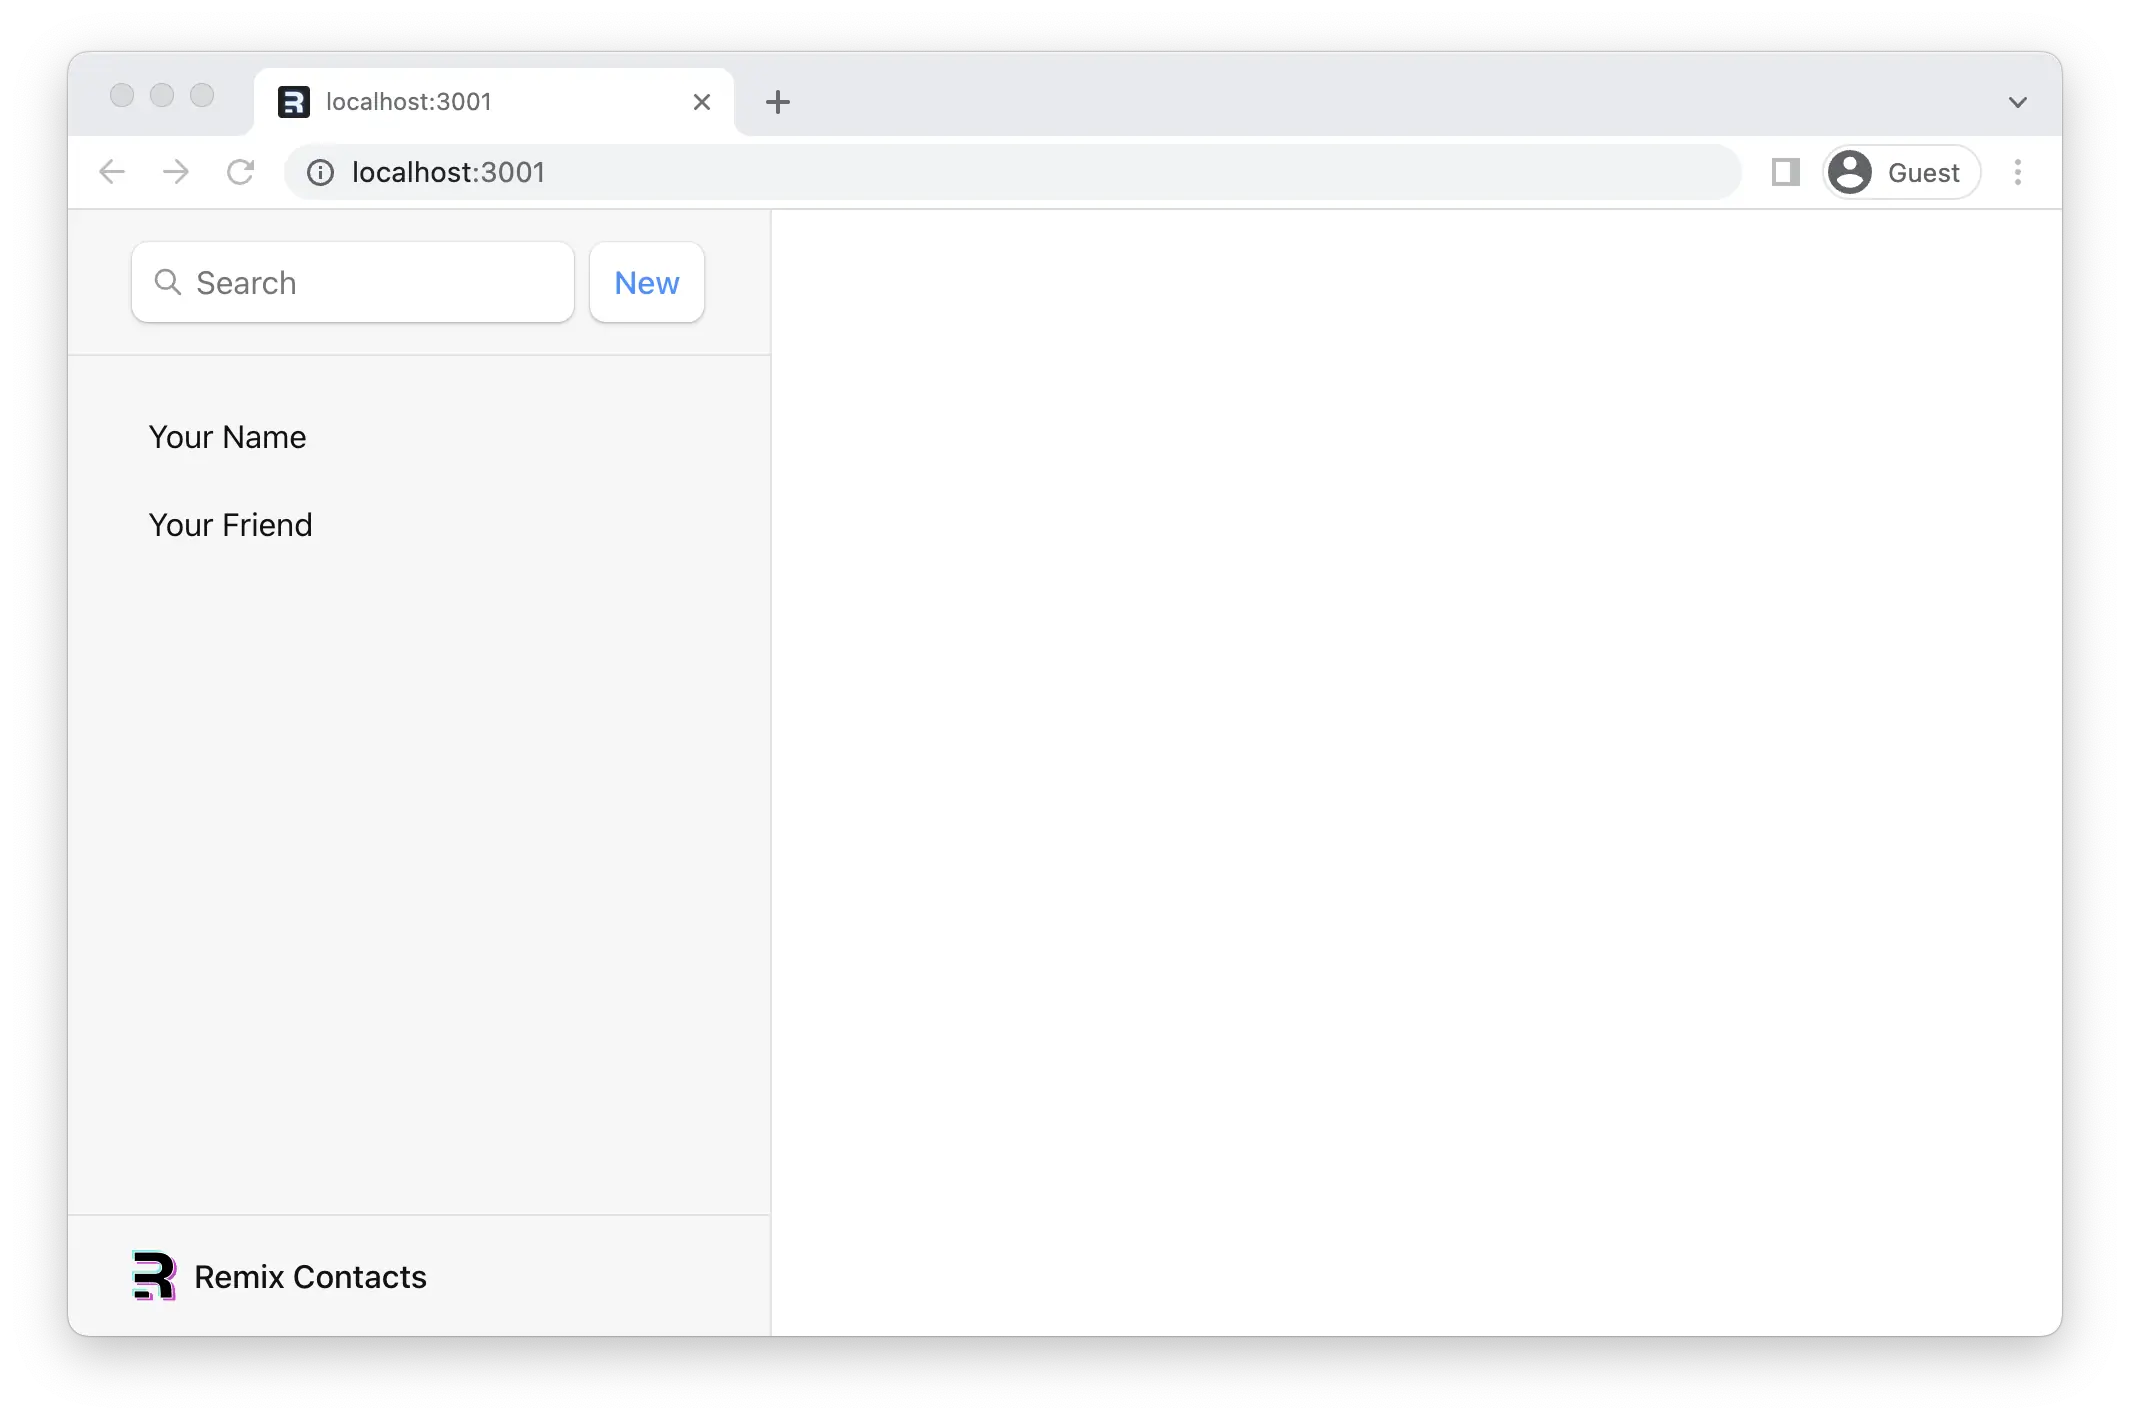
The app should look something like this now. It sure is nice having a designer who can also write the CSS, isn't it? (Thank you, Jim 🙏).
The Contact Route UI
If you click on one of the sidebar items, you'll get the default 404 page. Let's create a route that matches the url /contacts/1.
👉 Create the app/routes directory and contact route module
mkdir app/routes
touch app/routes/contacts.\$contactId.tsx
In the Remix route file convention, . will create a / in the URL and $ makes a segment dynamic. We just created a route that will match URLs that look like this:
/contacts/123/contacts/abc
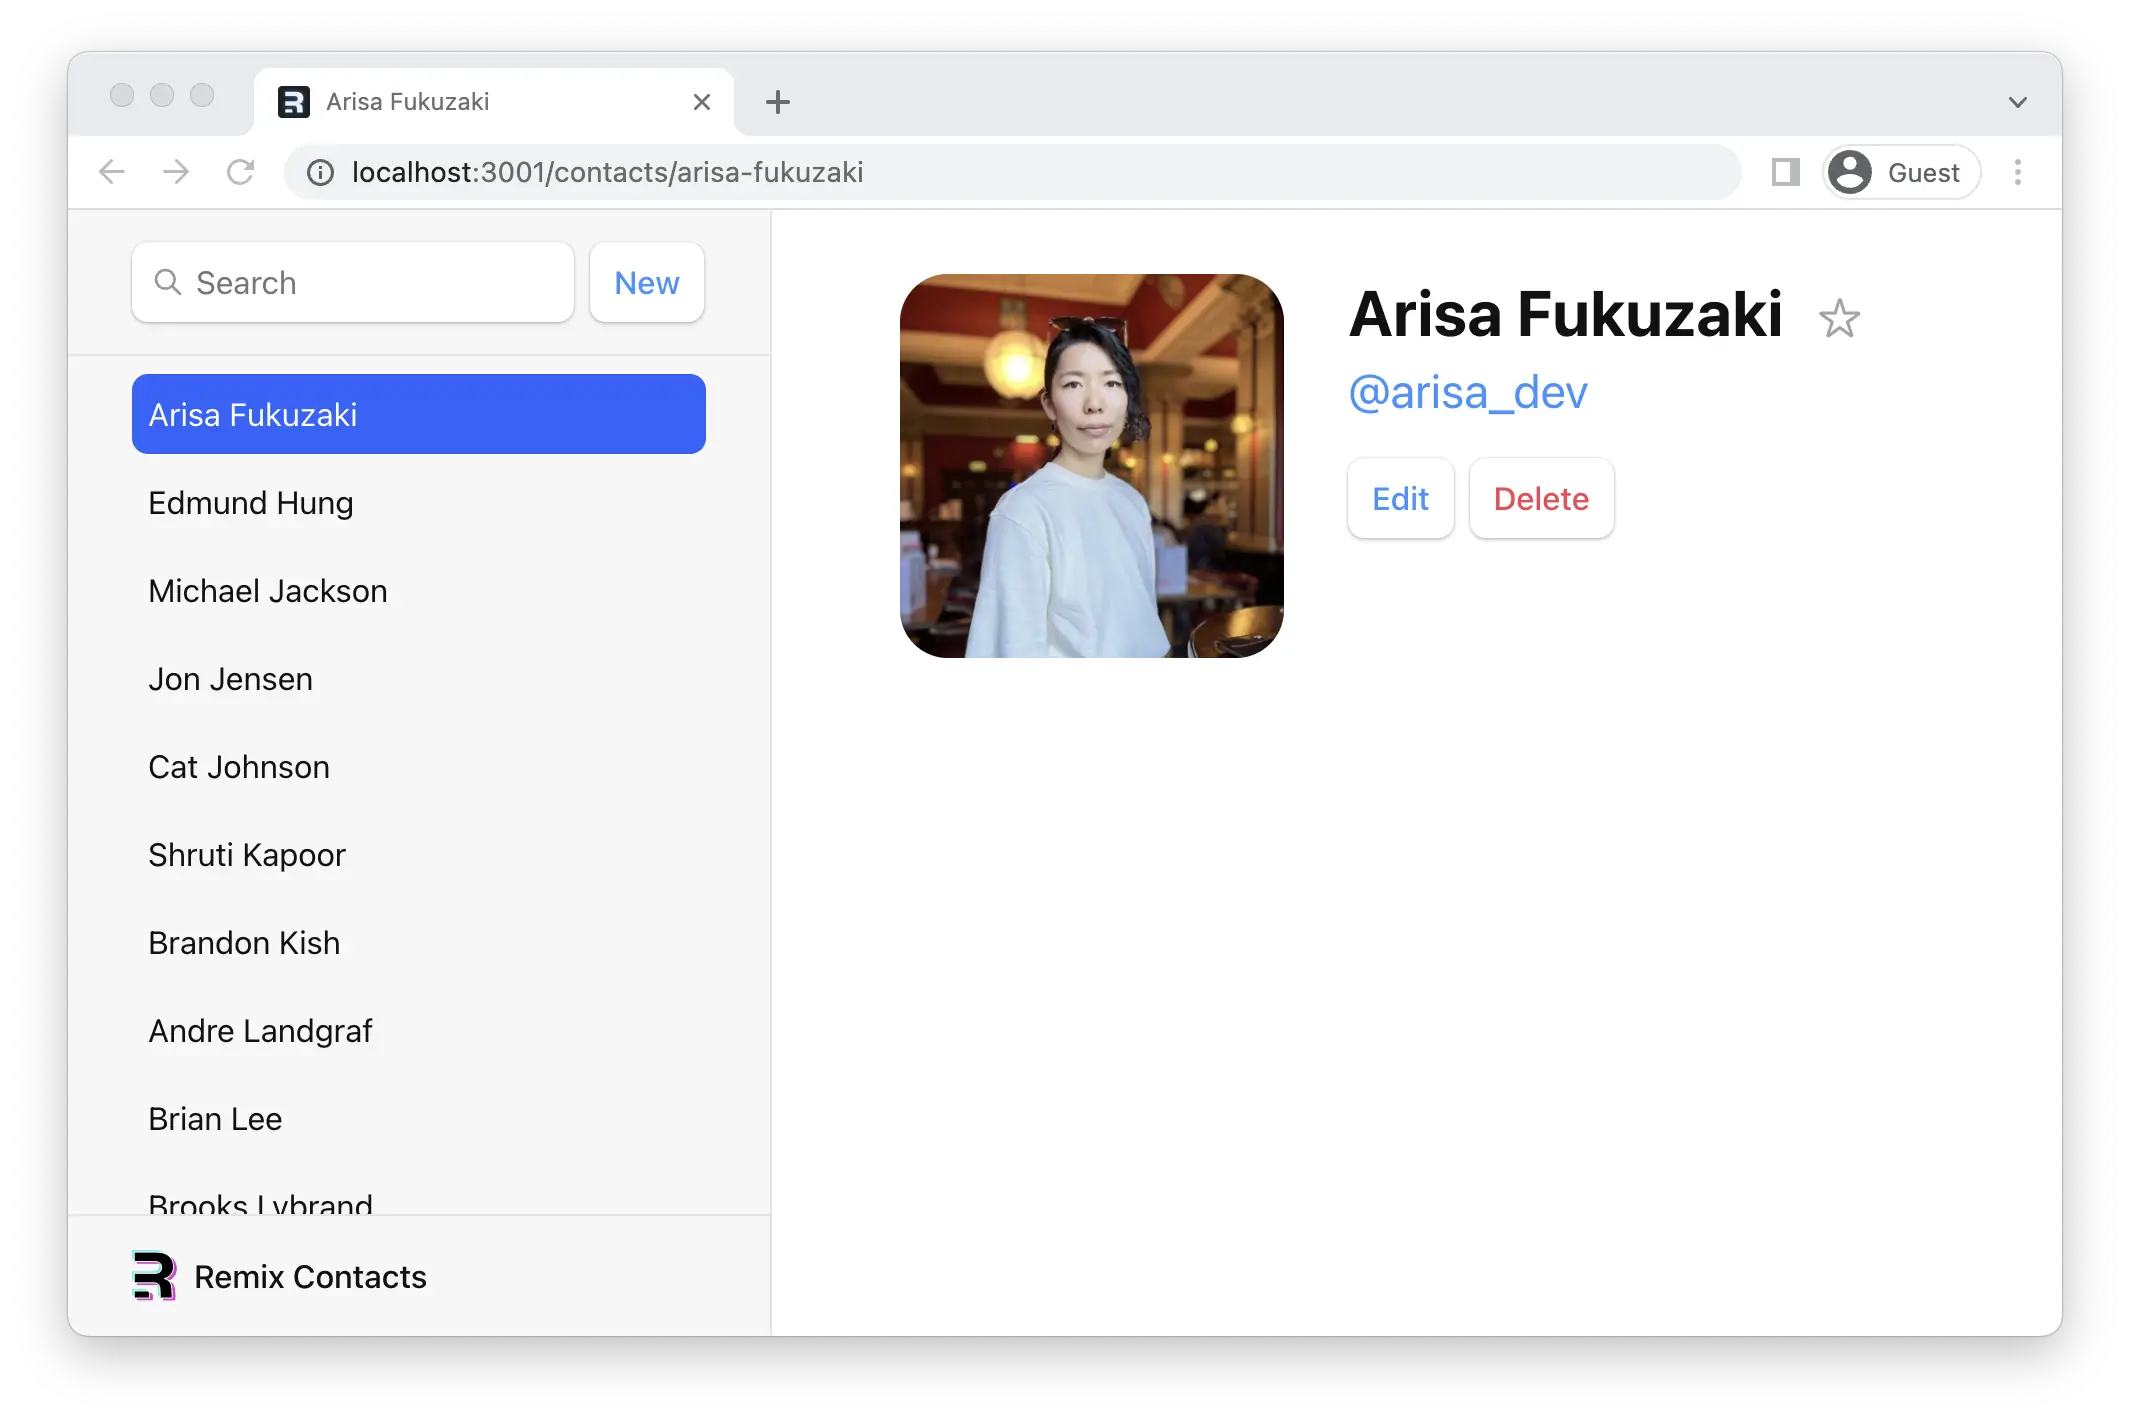
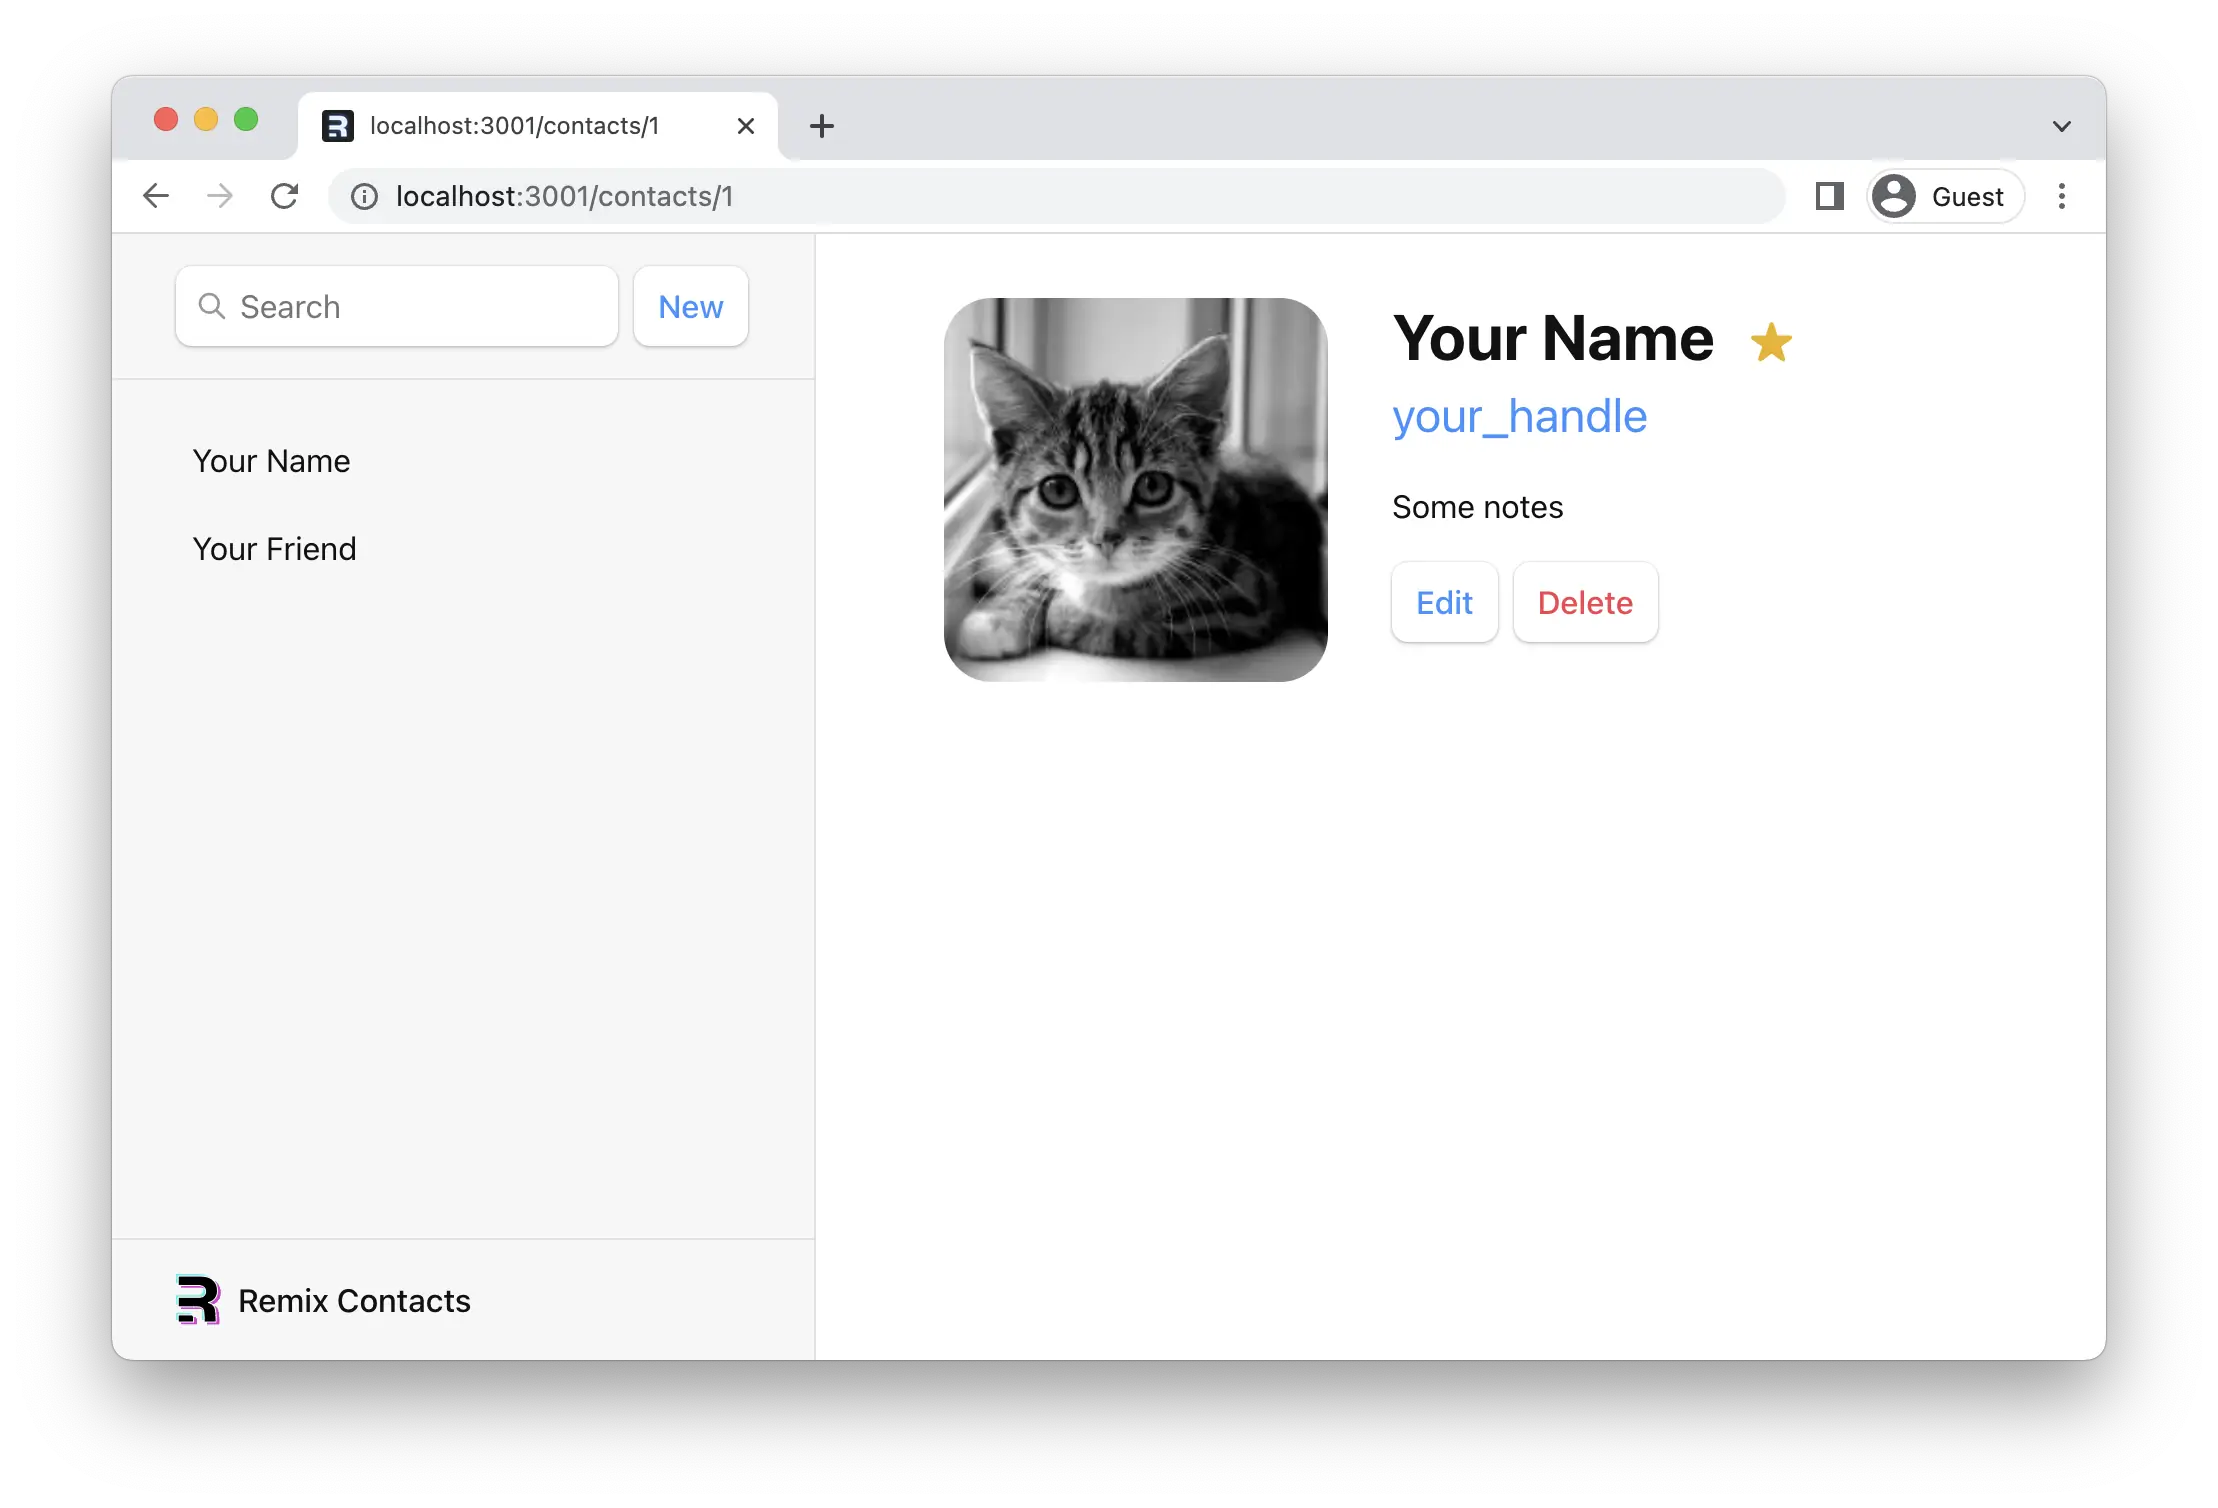
👉 Add the contact component UI
It's just a bunch of elements, feel free to copy/paste.
import { Form } from "@remix-run/react";
import type { FunctionComponent } from "react";

import type { ContactRecord } from "../data";

export default function Contact() {
  const contact = {
    first: "Your",
    last: "Name",
    avatar: "https://placecats.com/200/200",
    twitter: "your_handle",
    notes: "Some notes",
    favorite: true,
  };

  return (
    <div id="contact">
      <div>
        <img
          alt={`${contact.first} ${contact.last} avatar`}
          key={contact.avatar}
          src={contact.avatar}
        />
      </div>

      <div>
        <h1>
          {contact.first || contact.last ? (
            <>
              {contact.first} {contact.last}
            </>
          ) : (
            <i>No Name</i>
          )}{" "}
          <Favorite contact={contact} />
        </h1>

        {contact.twitter ? (
          <p>
            <a
              href={`https://twitter.com/${contact.twitter}`}
            >
              {contact.twitter}
            </a>
          </p>
        ) : null}

        {contact.notes ? <p>{contact.notes}</p> : null}

        <div>
          <Form action="edit">
            <button type="submit">Edit</button>
          </Form>

          <Form
            action="destroy"
            method="post"
            onSubmit={(event) => {
              const response = confirm(
                "Please confirm you want to delete this record."
              );
              if (!response) {
                event.preventDefault();
              }
            }}
          >
            <button type="submit">Delete</button>
          </Form>
        </div>
      </div>
    </div>
  );
}

const Favorite: FunctionComponent<{
  contact: Pick<ContactRecord, "favorite">;
}> = ({ contact }) => {
  const favorite = contact.favorite;

  return (
    <Form method="post">
      <button
        aria-label={
          favorite
            ? "Remove from favorites"
            : "Add to favorites"
        }
        name="favorite"
        value={favorite ? "false" : "true"}
      >
        {favorite ? "★" : "☆"}
      </button>
    </Form>
  );
};
Now if we click one of the links or visit /contacts/1 we get ... nothing new?
Nested Routes and Outlets
Since Remix is built on top of React Router, it supports nested routing. In order for child routes to render inside parent layouts, we need to render an Outlet in the parent. Let's fix it, open up app/root.tsx and render an outlet inside.
👉 Render an <Outlet />
// existing imports
import {
  Form,
  Links,
  Meta,
  Outlet,
  Scripts,
  ScrollRestoration,
} from "@remix-run/react";

// existing imports & code

export default function App() {
  return (
    <html lang="en">
      {/* other elements */}
      <body>
        <div id="sidebar">{/* other elements */}</div>
        <div id="detail">
          <Outlet />
        </div>
        {/* other elements */}
      </body>
    </html>
  );
}
Now the child route should be rendered through the outlet.
Client Side Routing
You may or may not have noticed, but when we click the links in the sidebar, the browser is doing a full document request for the next URL instead of client side routing.
Client side routing allows our app to update the URL without requesting another document from the server. Instead, the app can immediately render a new UI. Let's make it happen with <Link>.
👉 Change the sidebar <a href> to <Link to>
// existing imports
import {
  Form,
  Link,
  Links,
  Meta,
  Outlet,
  Scripts,
  ScrollRestoration,
} from "@remix-run/react";

// existing imports and exports

export default function App() {
  return (
    <html lang="en">
      {/* other elements */}
      <body>
        <div id="sidebar">
          {/* other elements */}
          <nav>
            <ul>
              <li>
                <Link to={`/contacts/1`}>Your Name</Link>
              </li>
              <li>
                <Link to={`/contacts/2`}>Your Friend</Link>
              </li>
            </ul>
          </nav>
        </div>
        {/* other elements */}
      </body>
    </html>
  );
}
You can open the network tab in the browser devtools to see that it's not requesting documents anymore.
Loading Data
URL segments, layouts, and data are more often than not coupled (tripled?) together. We can see it in this app already:
| URL Segment | Component | Data |
|---|---|---|
| / | <Root> |
list of contacts |
| contacts/:contactId | <Contact> |
individual contact |
Because of this natural coupling, Remix has data conventions to get data into your route components easily.
There are two APIs we'll be using to load data, loader and useLoaderData. First we'll create and export a loader function in the root route and then render the data.
👉 Export a loader function from app/root.tsx and render the data
// existing imports
import {
  Form,
  Link,
  Links,
  Meta,
  Outlet,
  Scripts,
  ScrollRestoration,
  useLoaderData,
} from "@remix-run/react";

// existing imports
import { getContacts } from "./data";

// existing exports

export const loader = async () => {
  const contacts = await getContacts();
  return { contacts };
};

export default function App() {
  const { contacts } = useLoaderData();

  return (
    <html lang="en">
      {/* other elements */}
      <body>
        <div id="sidebar">
          {/* other elements */}
          <nav>
            {contacts.length ? (
              <ul>
                {contacts.map((contact) => (
                  <li key={contact.id}>
                    <Link to={`contacts/${contact.id}`}>
                      {contact.first || contact.last ? (
                        <>
                          {contact.first} {contact.last}
                        </>
                      ) : (
                        <i>No Name</i>
                      )}{" "}
                      {contact.favorite ? (
                        <span>★</span>
                      ) : null}
                    </Link>
                  </li>
                ))}
              </ul>
            ) : (
              <p>
                <i>No contacts</i>
              </p>
            )}
          </nav>
        </div>
        {/* other elements */}
      </body>
    </html>
  );
}
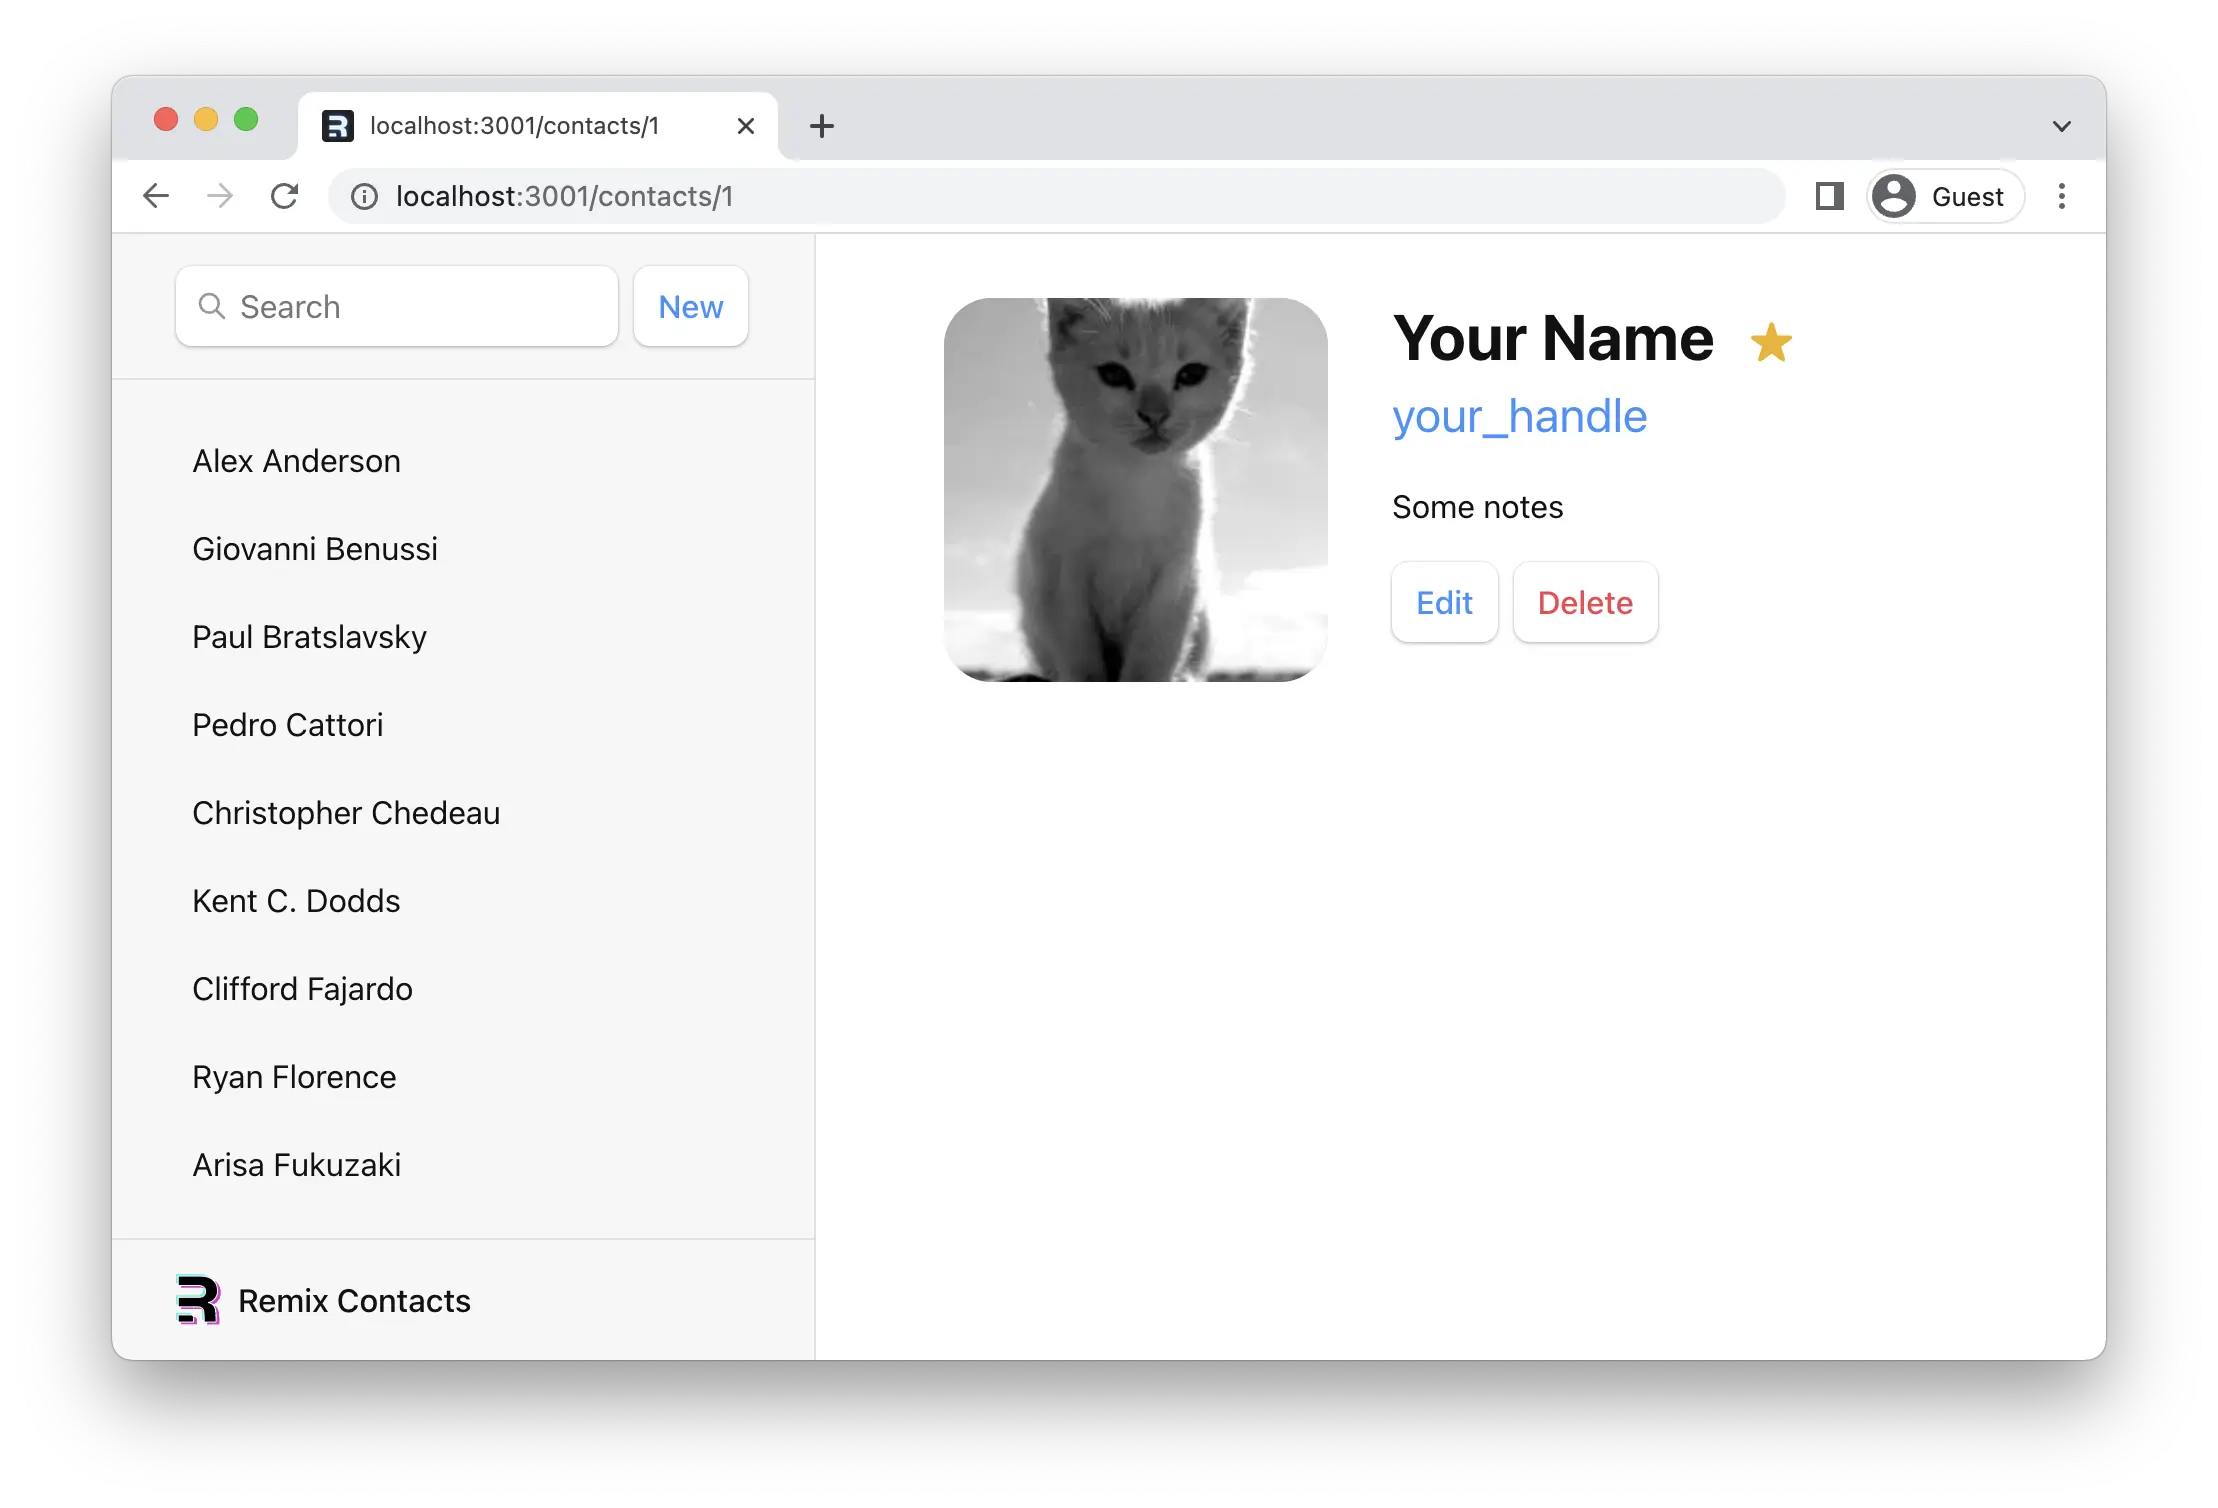
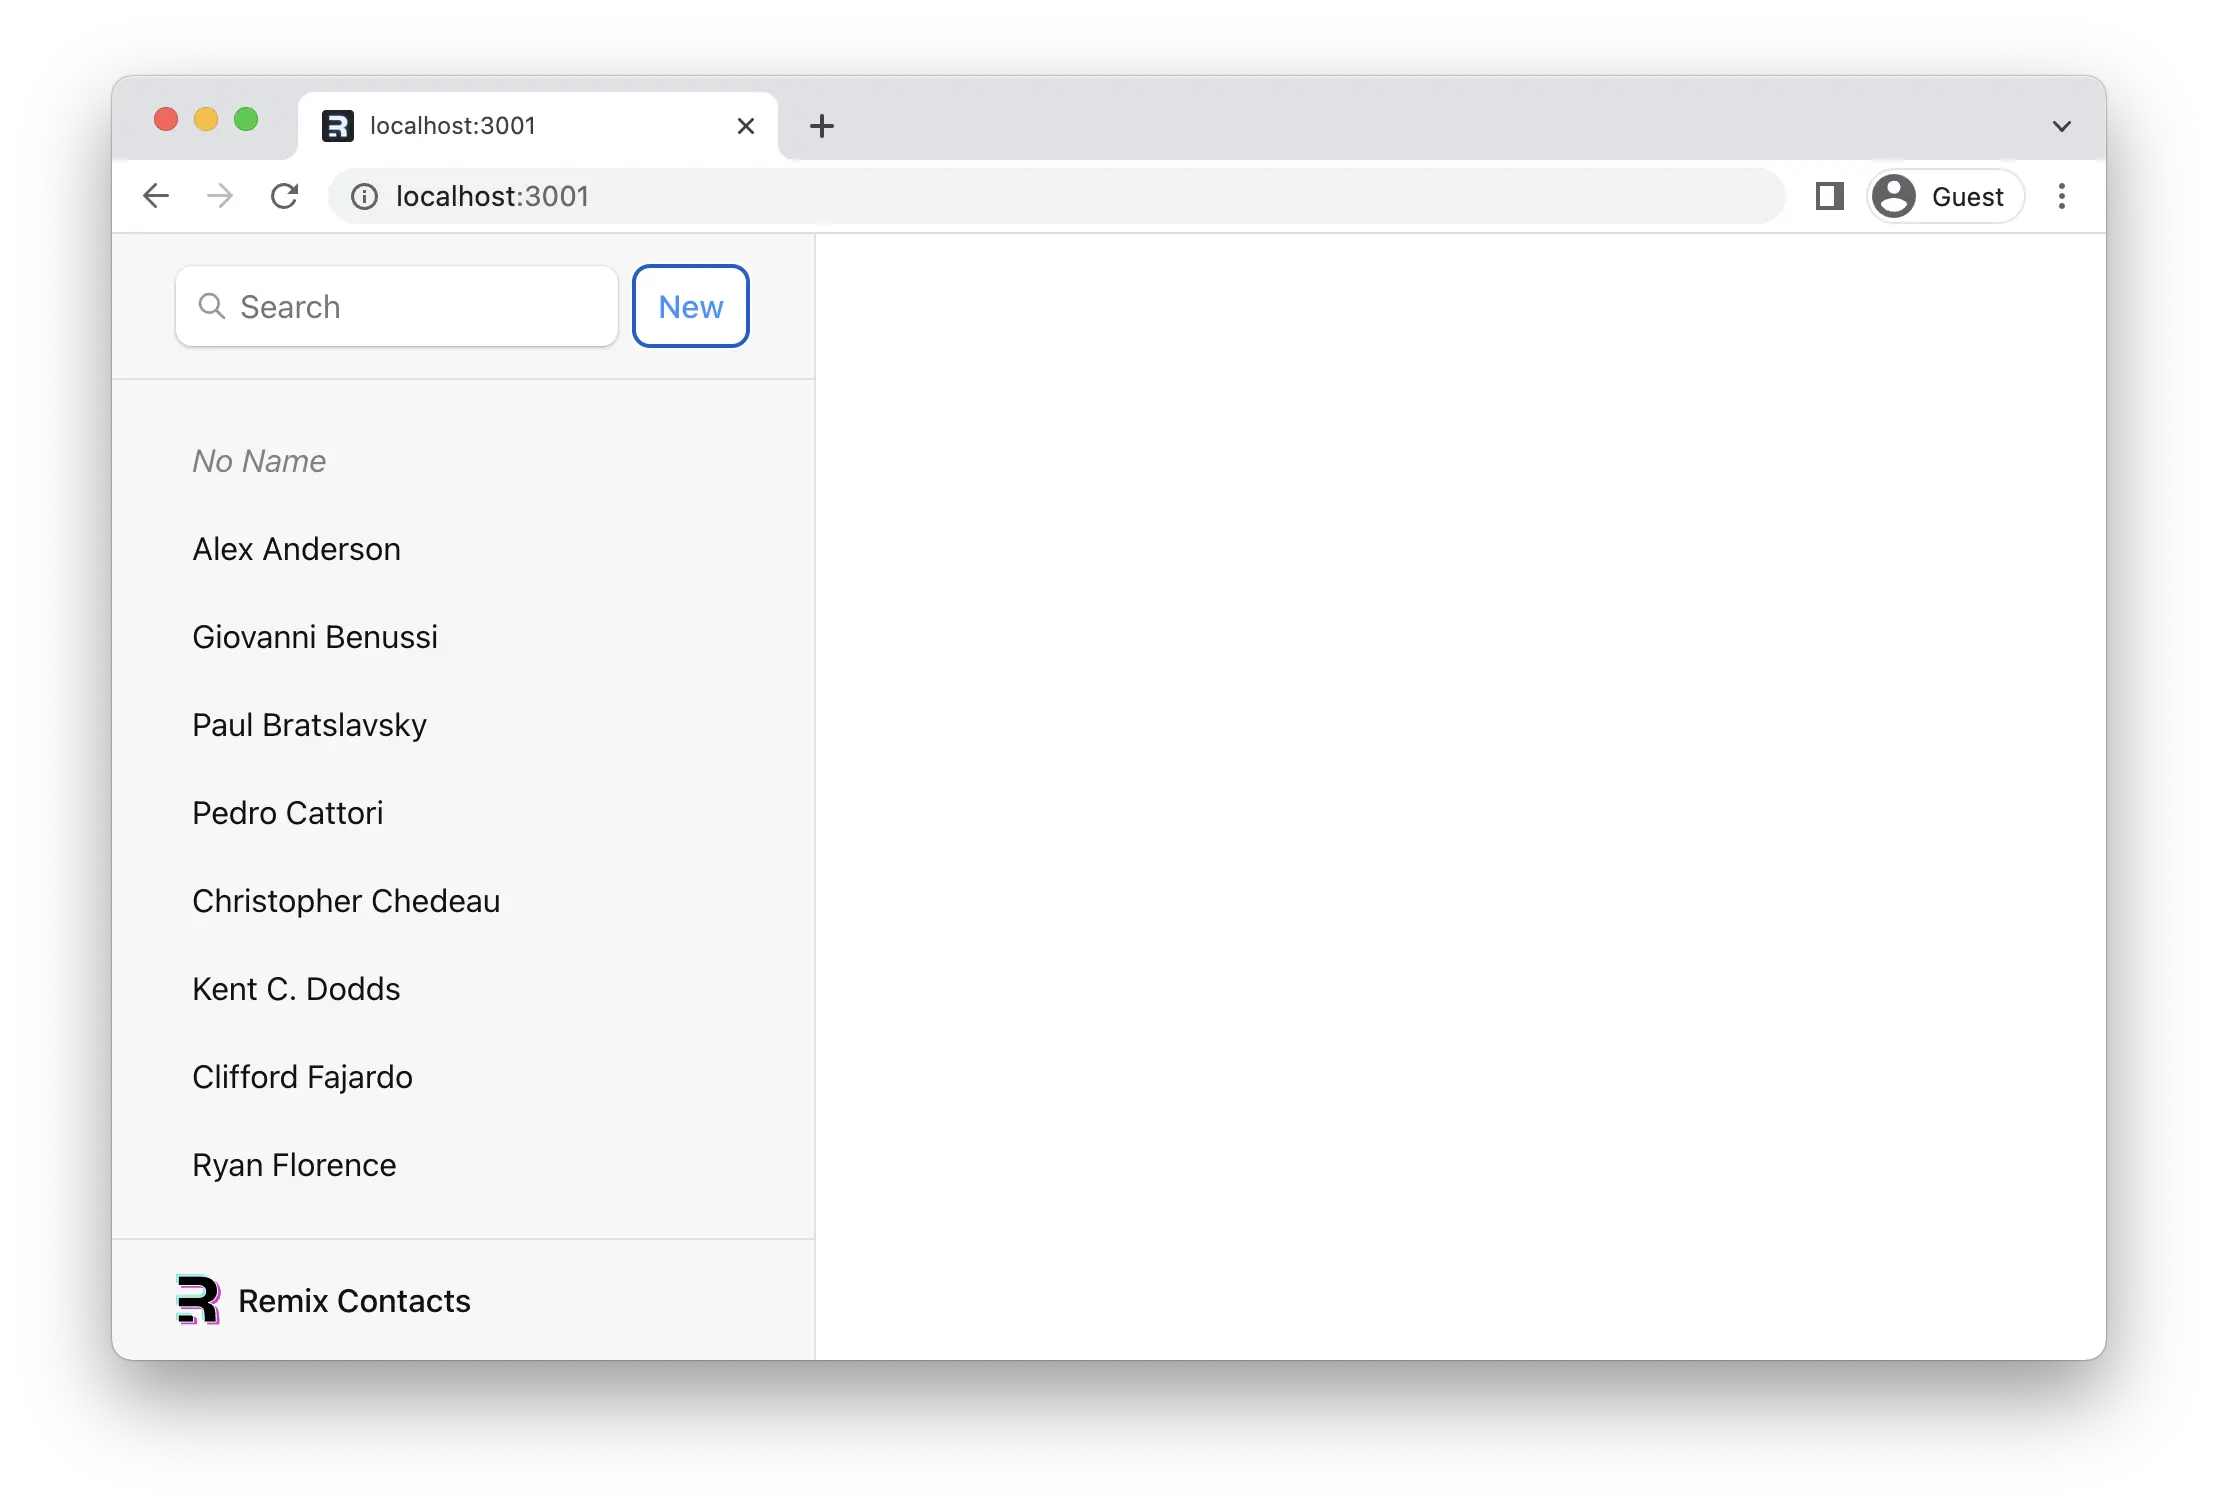
That's it! Remix will now automatically keep that data in sync with your UI. The sidebar should now look like this:
Type Inference
You may have noticed TypeScript complaining about the contact type inside the map. We can add a quick annotation to get type inference about our data with typeof loader:
// existing imports and exports

export default function App() {
  const { contacts } = useLoaderData<typeof loader>();

  // existing code
}
URL Params in Loaders
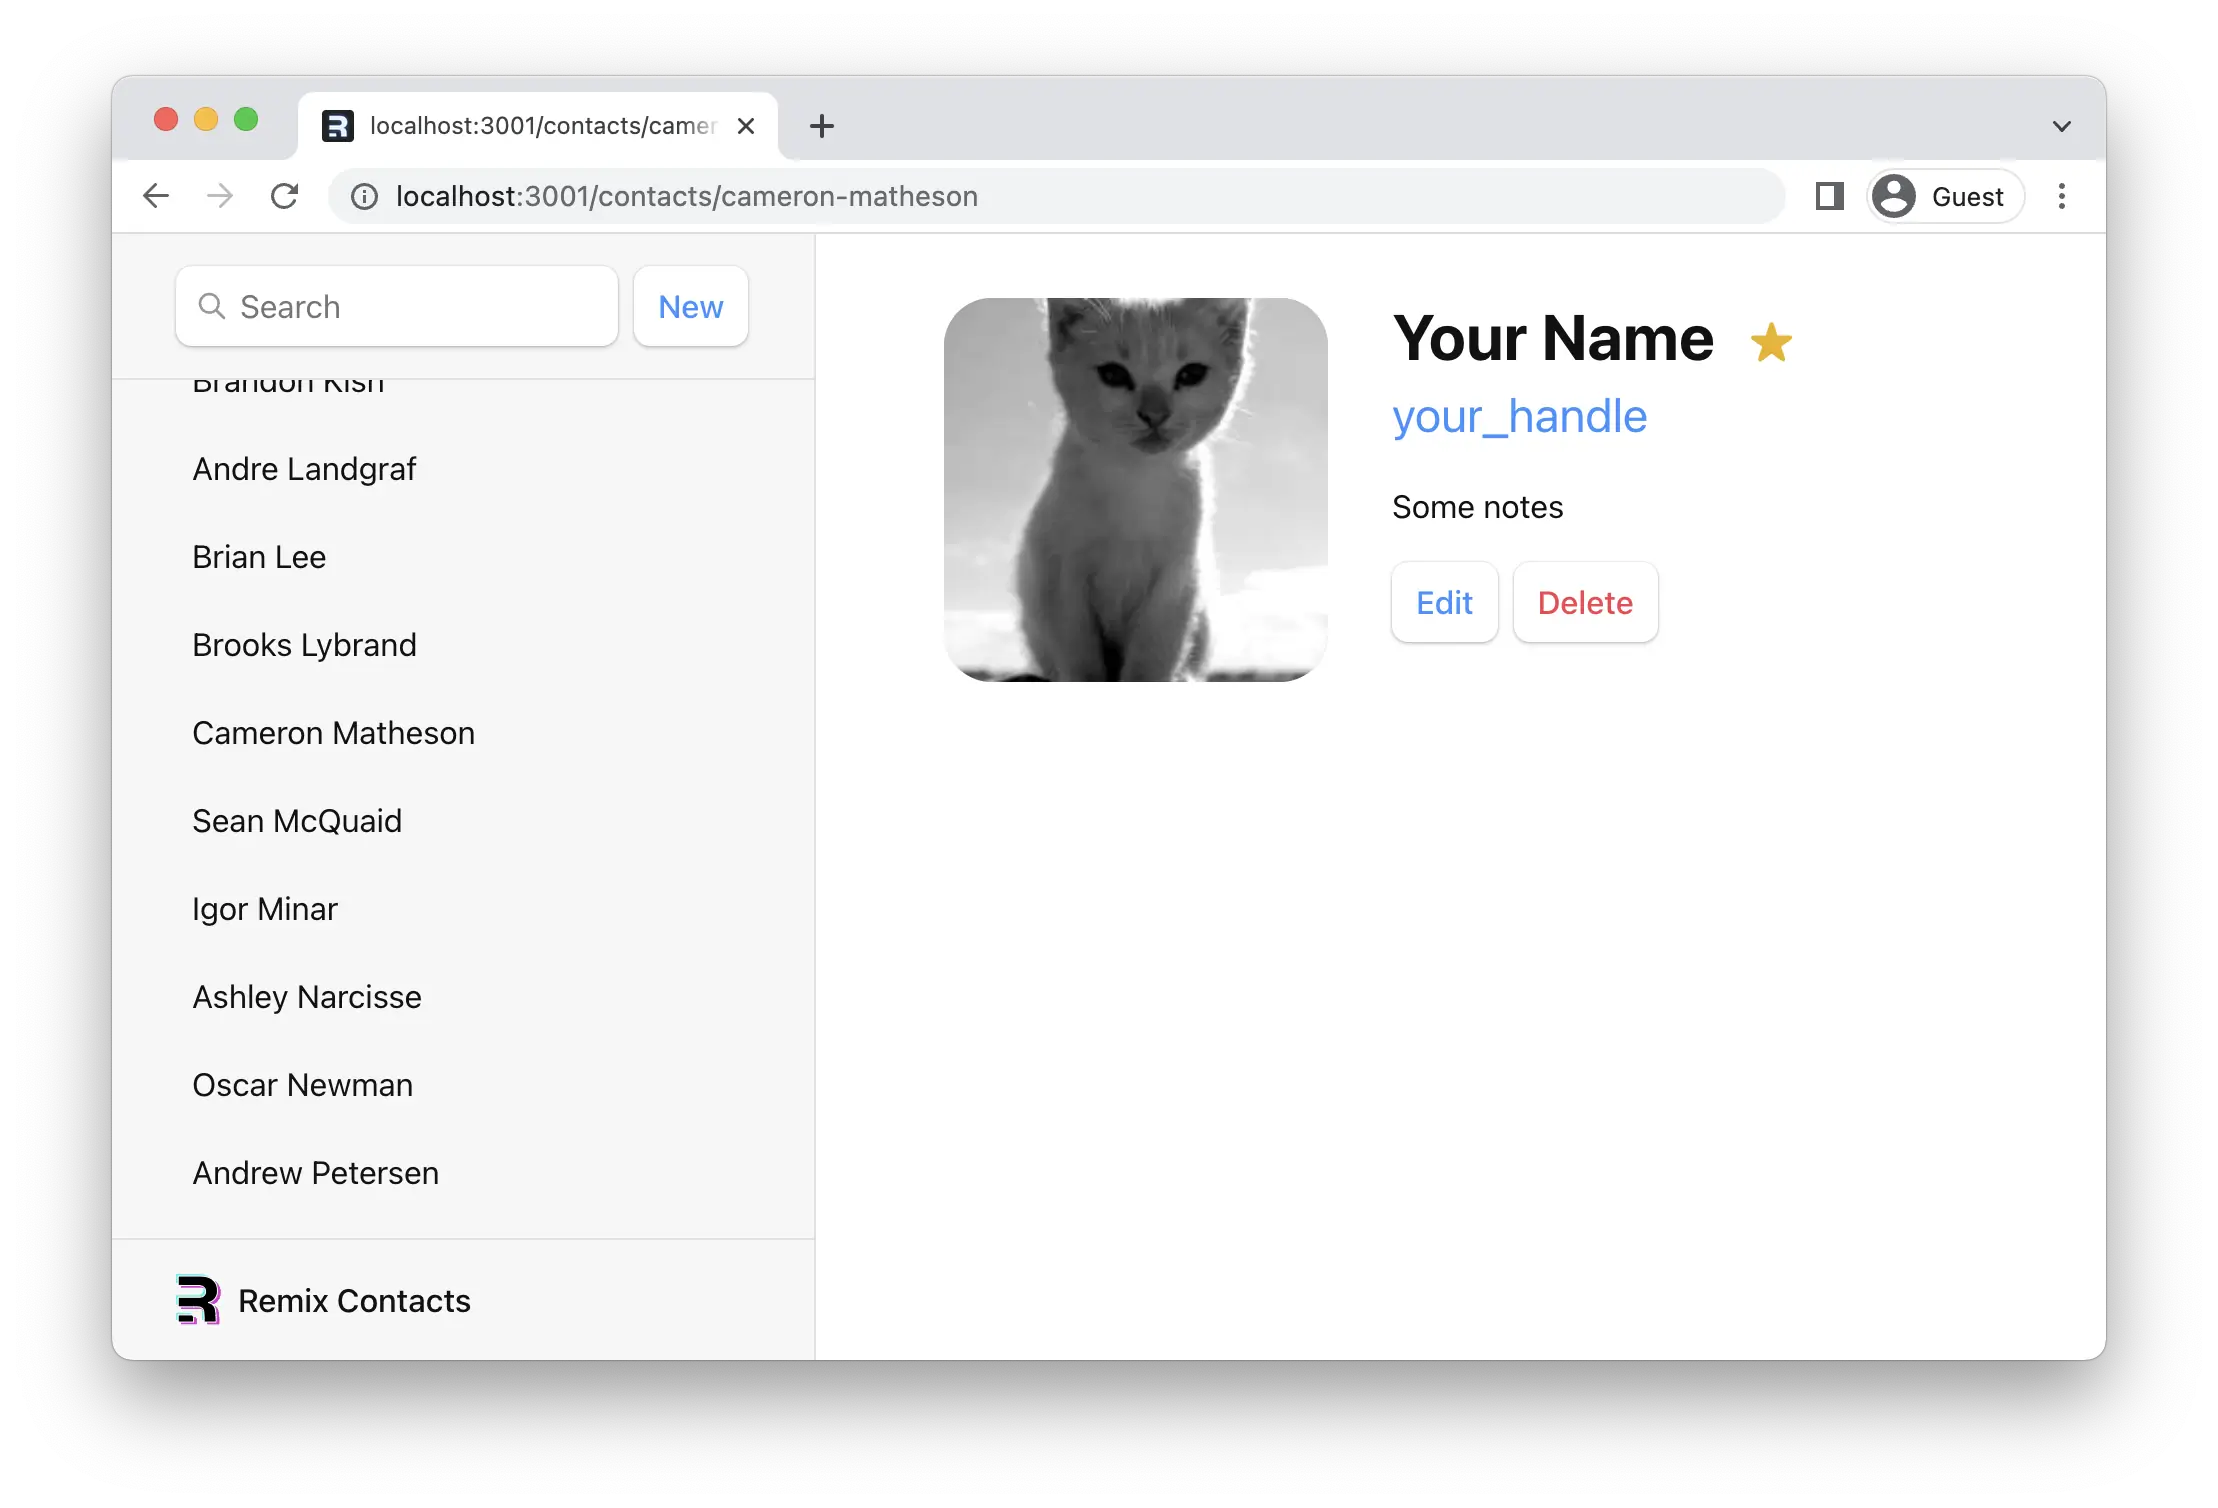
👉 Click on one of the sidebar links
We should be seeing our old static contact page again, with one difference: the URL now has a real ID for the record.
Remember the $contactId part of the file name at app/routes/contacts.$contactId.tsx? These dynamic segments will match dynamic (changing) values in that position of the URL. We call these values in the URL "URL Params", or just "params" for short.
These params are passed to the loader with keys that match the dynamic segment. For example, our segment is named $contactId so the value will be passed as params.contactId.
These params are most often used to find a record by ID. Let's try it out.
👉 Add a loader function to the contact page and access data with useLoaderData
import { Form, useLoaderData } from "@remix-run/react";
// existing imports

import { getContact } from "../data";

export const loader = async ({ params }) => {
  const contact = await getContact(params.contactId);
  return { contact };
};

export default function Contact() {
  const { contact } = useLoaderData<typeof loader>();

  // existing code
}

// existing code
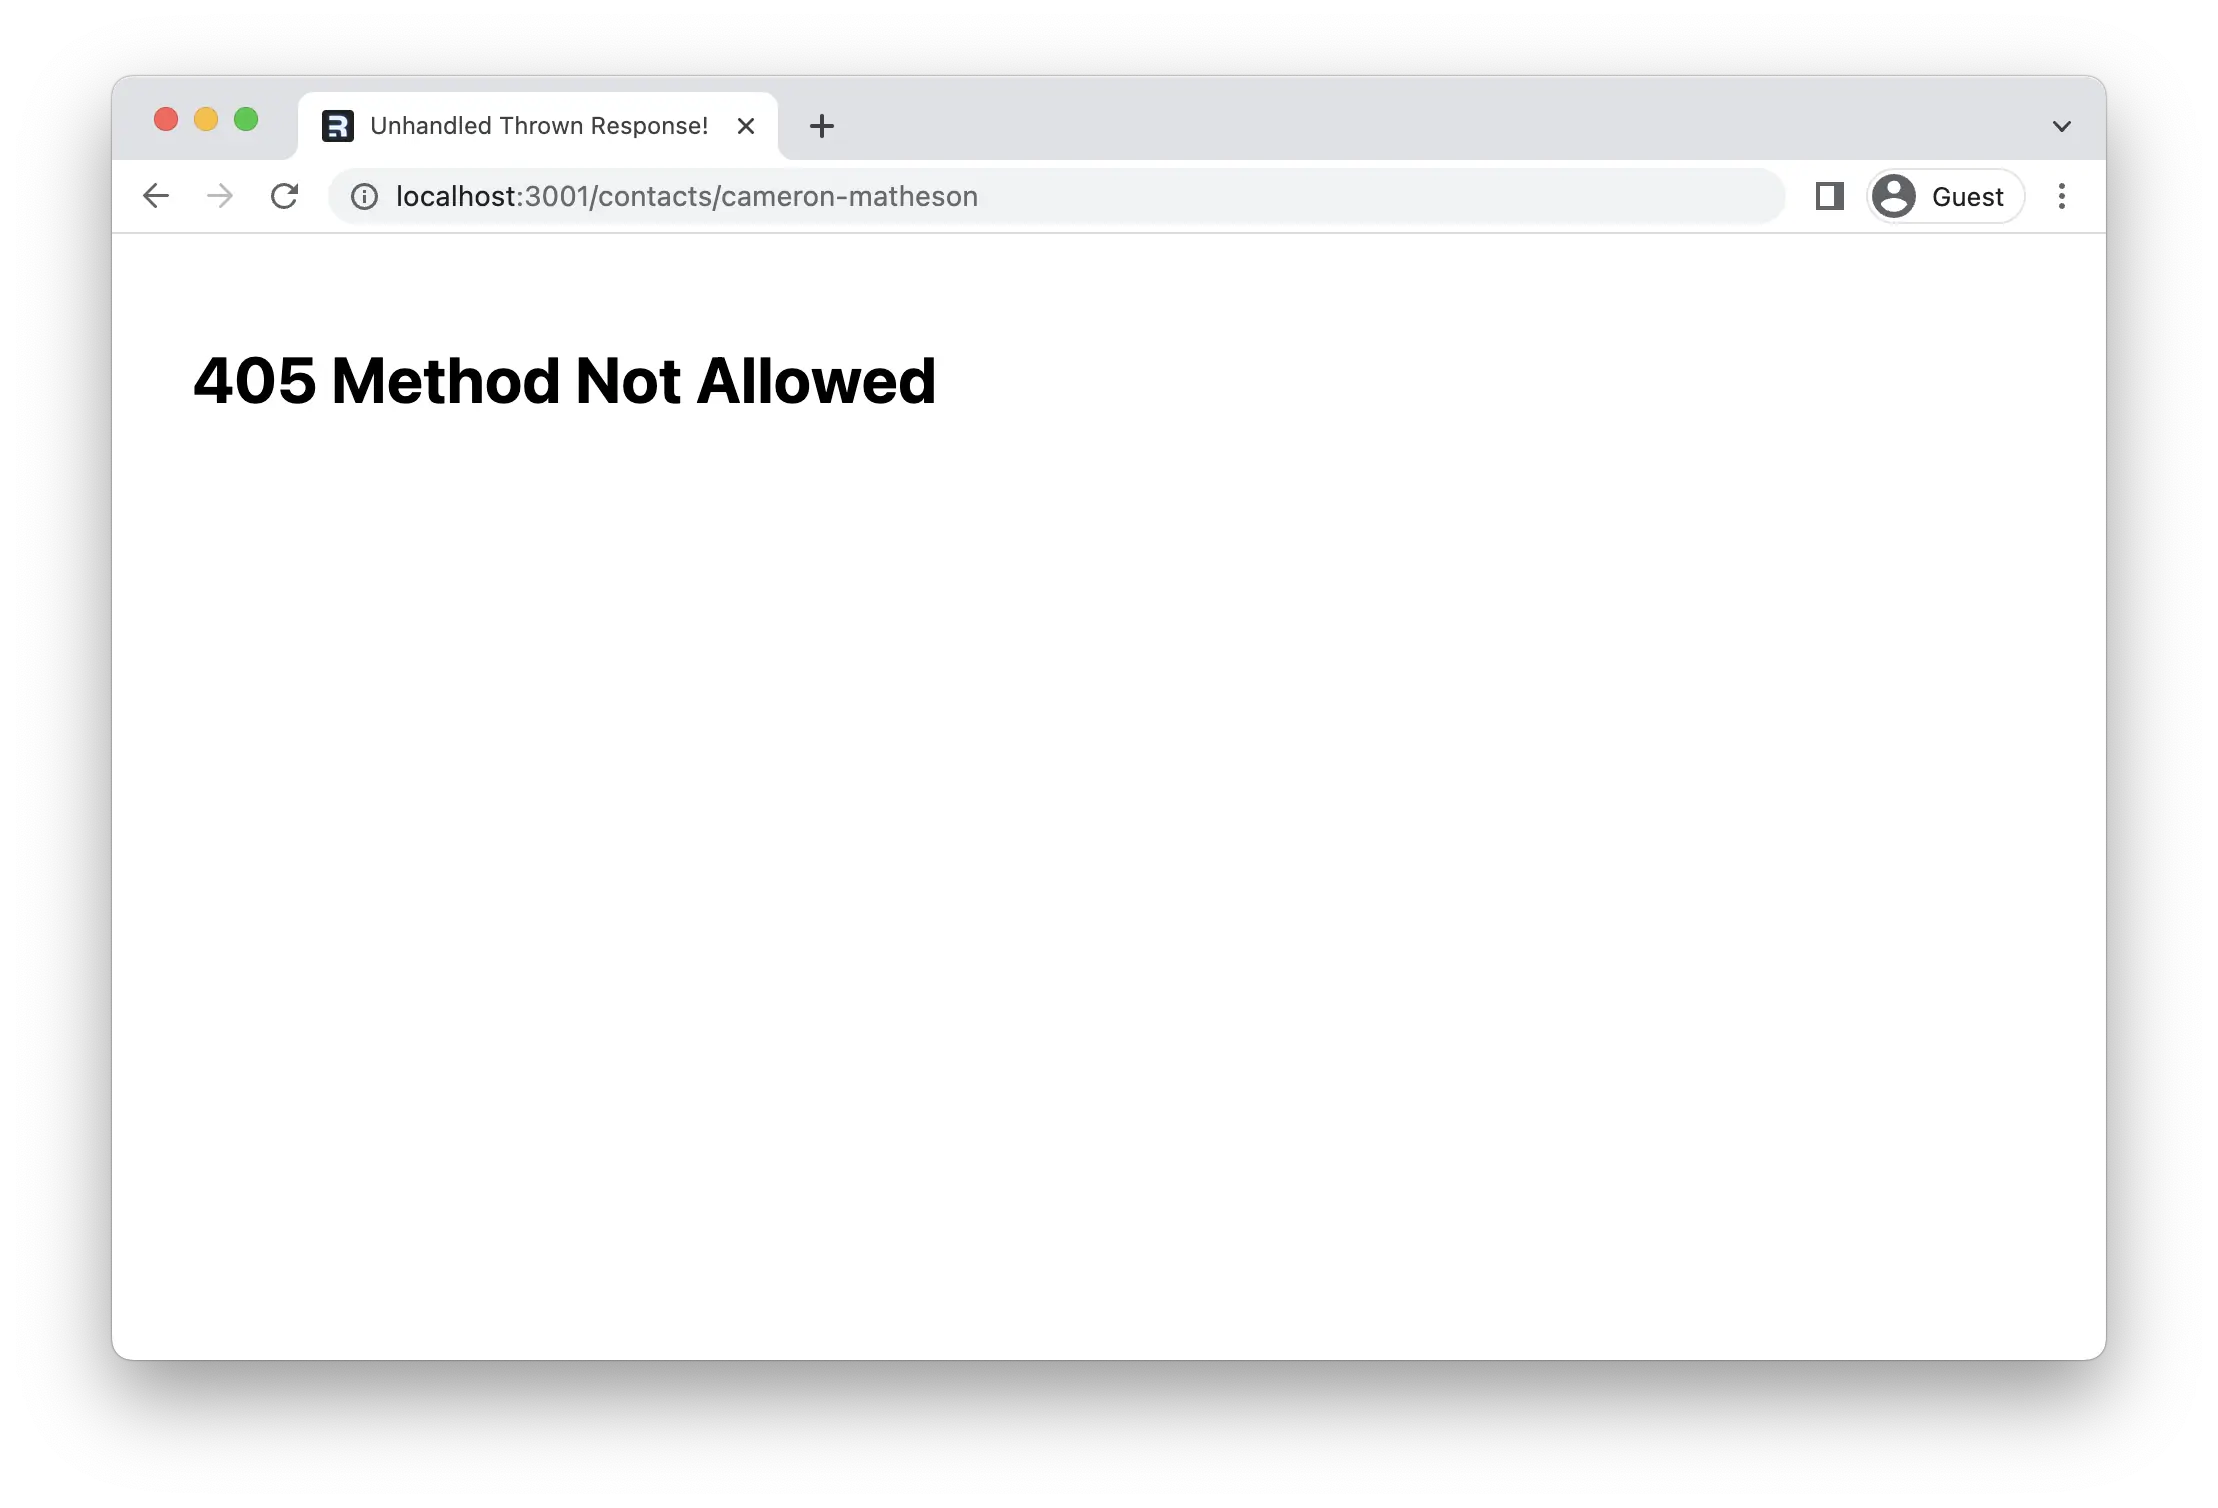
Validating Params and Throwing Responses
TypeScript is very upset with us, let's make it happy and see what that forces us to consider:
import type { LoaderFunctionArgs } from "@remix-run/node";
// existing imports
import invariant from "tiny-invariant";

// existing imports

export const loader = async ({
  params,
}: LoaderFunctionArgs) => {
  invariant(params.contactId, "Missing contactId param");
  const contact = await getContact(params.contactId);
  return { contact };
};

// existing code
The first problem this highlights is we might have gotten the param's name wrong between the file name and the code (maybe you changed the name of the file!). Invariant is a handy function for throwing an error with a custom message when you anticipated a potential issue with your code.
Next, the useLoaderData<typeof loader>() now knows that we got a contact or null (maybe there is no contact with that ID). This potential null is cumbersome for our component code, and the TS errors are flying around still.
We could account for the possibility of the contact being not found in component code, but the webby thing to do is send a proper 404. We can do that in the loader and solve all of our problems at once.
// existing imports

export const loader = async ({
  params,
}: LoaderFunctionArgs) => {
  invariant(params.contactId, "Missing contactId param");
  const contact = await getContact(params.contactId);
  if (!contact) {
    throw new Response("Not Found", { status: 404 });
  }
  return { contact };
};

// existing code
Now, if the user isn't found, code execution down this path stops and Remix renders the error path instead. Components in Remix can focus only on the happy path 😁
Data Mutations
We'll create our first contact in a second, but first let's talk about HTML.
Remix emulates HTML Form navigation as the data mutation primitive, which used to be the only way prior to the JavaScript cambrian explosion. Don't be fooled by the simplicity! Forms in Remix give you the UX capabilities of client-rendered apps with the simplicity of the "old school" web model.
While unfamiliar to some web developers, HTML forms actually cause a navigation in the browser, just like clicking a link. The only difference is in the request: links can only change the URL while forms can also change the request method (GET vs. POST) and the request body (POST form data).
Without client side routing, the browser will serialize the form's data automatically and send it to the server as the request body for POST, and as URLSearchParams for GET. Remix does the same thing, except instead of sending the request to the server, it uses client side routing and sends it to the route's action function.
We can test this out by clicking the "New" button in our app.
Remix sends a 405 because there is no code on the server to handle this form navigation.
Creating Contacts
We'll create new contacts by exporting an action function in our root route. When the user clicks the "new" button, the form will POST to the root route action.
👉 Export an action function from app/root.tsx
// existing imports

import { createEmptyContact, getContacts } from "./data";

export const action = async () => {
  const contact = await createEmptyContact();
  return { contact };
};

// existing code
That's it! Go ahead and click the "New" button, and you should see a new record pop into the list 🥳
The createEmptyContact method just creates an empty contact with no name or data or anything. But it does still create a record, promise!
🧐 Wait a sec ... How did the sidebar update? Where did we call the
actionfunction? Where's the code to re-fetch the data? Where areuseState,onSubmitanduseEffect?!
This is where the "old school web" programming model shows up. <Form> prevents the browser from sending the request to the server and sends it to your route's action function instead with fetch.
In web semantics, a POST usually means some data is changing. By convention, Remix uses this as a hint to automatically revalidate the data on the page after the action finishes.
In fact, since it's all just HTML and HTTP, you could disable JavaScript and the whole thing will still work. Instead of Remix serializing the form and making a fetch request to your server, the browser will serialize the form and make a document request. From there Remix will render the page server side and send it down. It's the same UI in the end either way.
We'll keep JavaScript around, though, because we're going to make a better user experience than spinning favicons and static documents.
Updating Data
Let's add a way to fill the information for our new record.
Just like creating data, you update data with <Form>. Let's make a new route at app/routes/contacts.$contactId_.edit.tsx.
👉 Create the edit component
touch app/routes/contacts.\$contactId_.edit.tsx
Note the weird _ in $contactId_. By default, routes will automatically nest inside routes with the same prefixed name. Adding a trailing _ tells the route to not nest inside app/routes/contacts.$contactId.tsx. Read more in the Route File Naming guide.
👉 Add the edit page UI
Nothing we haven't seen before, feel free to copy/paste:
import type { LoaderFunctionArgs } from "@remix-run/node";
import { Form, useLoaderData } from "@remix-run/react";
import invariant from "tiny-invariant";

import { getContact } from "../data";

export const loader = async ({
  params,
}: LoaderFunctionArgs) => {
  invariant(params.contactId, "Missing contactId param");
  const contact = await getContact(params.contactId);
  if (!contact) {
    throw new Response("Not Found", { status: 404 });
  }
  return { contact };
};

export default function EditContact() {
  const { contact } = useLoaderData<typeof loader>();

  return (
    <Form key={contact.id} id="contact-form" method="post">
      <p>
        <span>Name</span>
        <input
          aria-label="First name"
          defaultValue={contact.first}
          name="first"
          placeholder="First"
          type="text"
        />
        <input
          aria-label="Last name"
          defaultValue={contact.last}
          name="last"
          placeholder="Last"
          type="text"
        />
      </p>
      <label>
        <span>Twitter</span>
        <input
          defaultValue={contact.twitter}
          name="twitter"
          placeholder="@jack"
          type="text"
        />
      </label>
      <label>
        <span>Avatar URL</span>
        <input
          aria-label="Avatar URL"
          defaultValue={contact.avatar}
          name="avatar"
          placeholder="https://example.com/avatar.jpg"
          type="text"
        />
      </label>
      <label>
        <span>Notes</span>
        <textarea
          defaultValue={contact.notes}
          name="notes"
          rows={6}
        />
      </label>
      <p>
        <button type="submit">Save</button>
        <button type="button">Cancel</button>
      </p>
    </Form>
  );
}
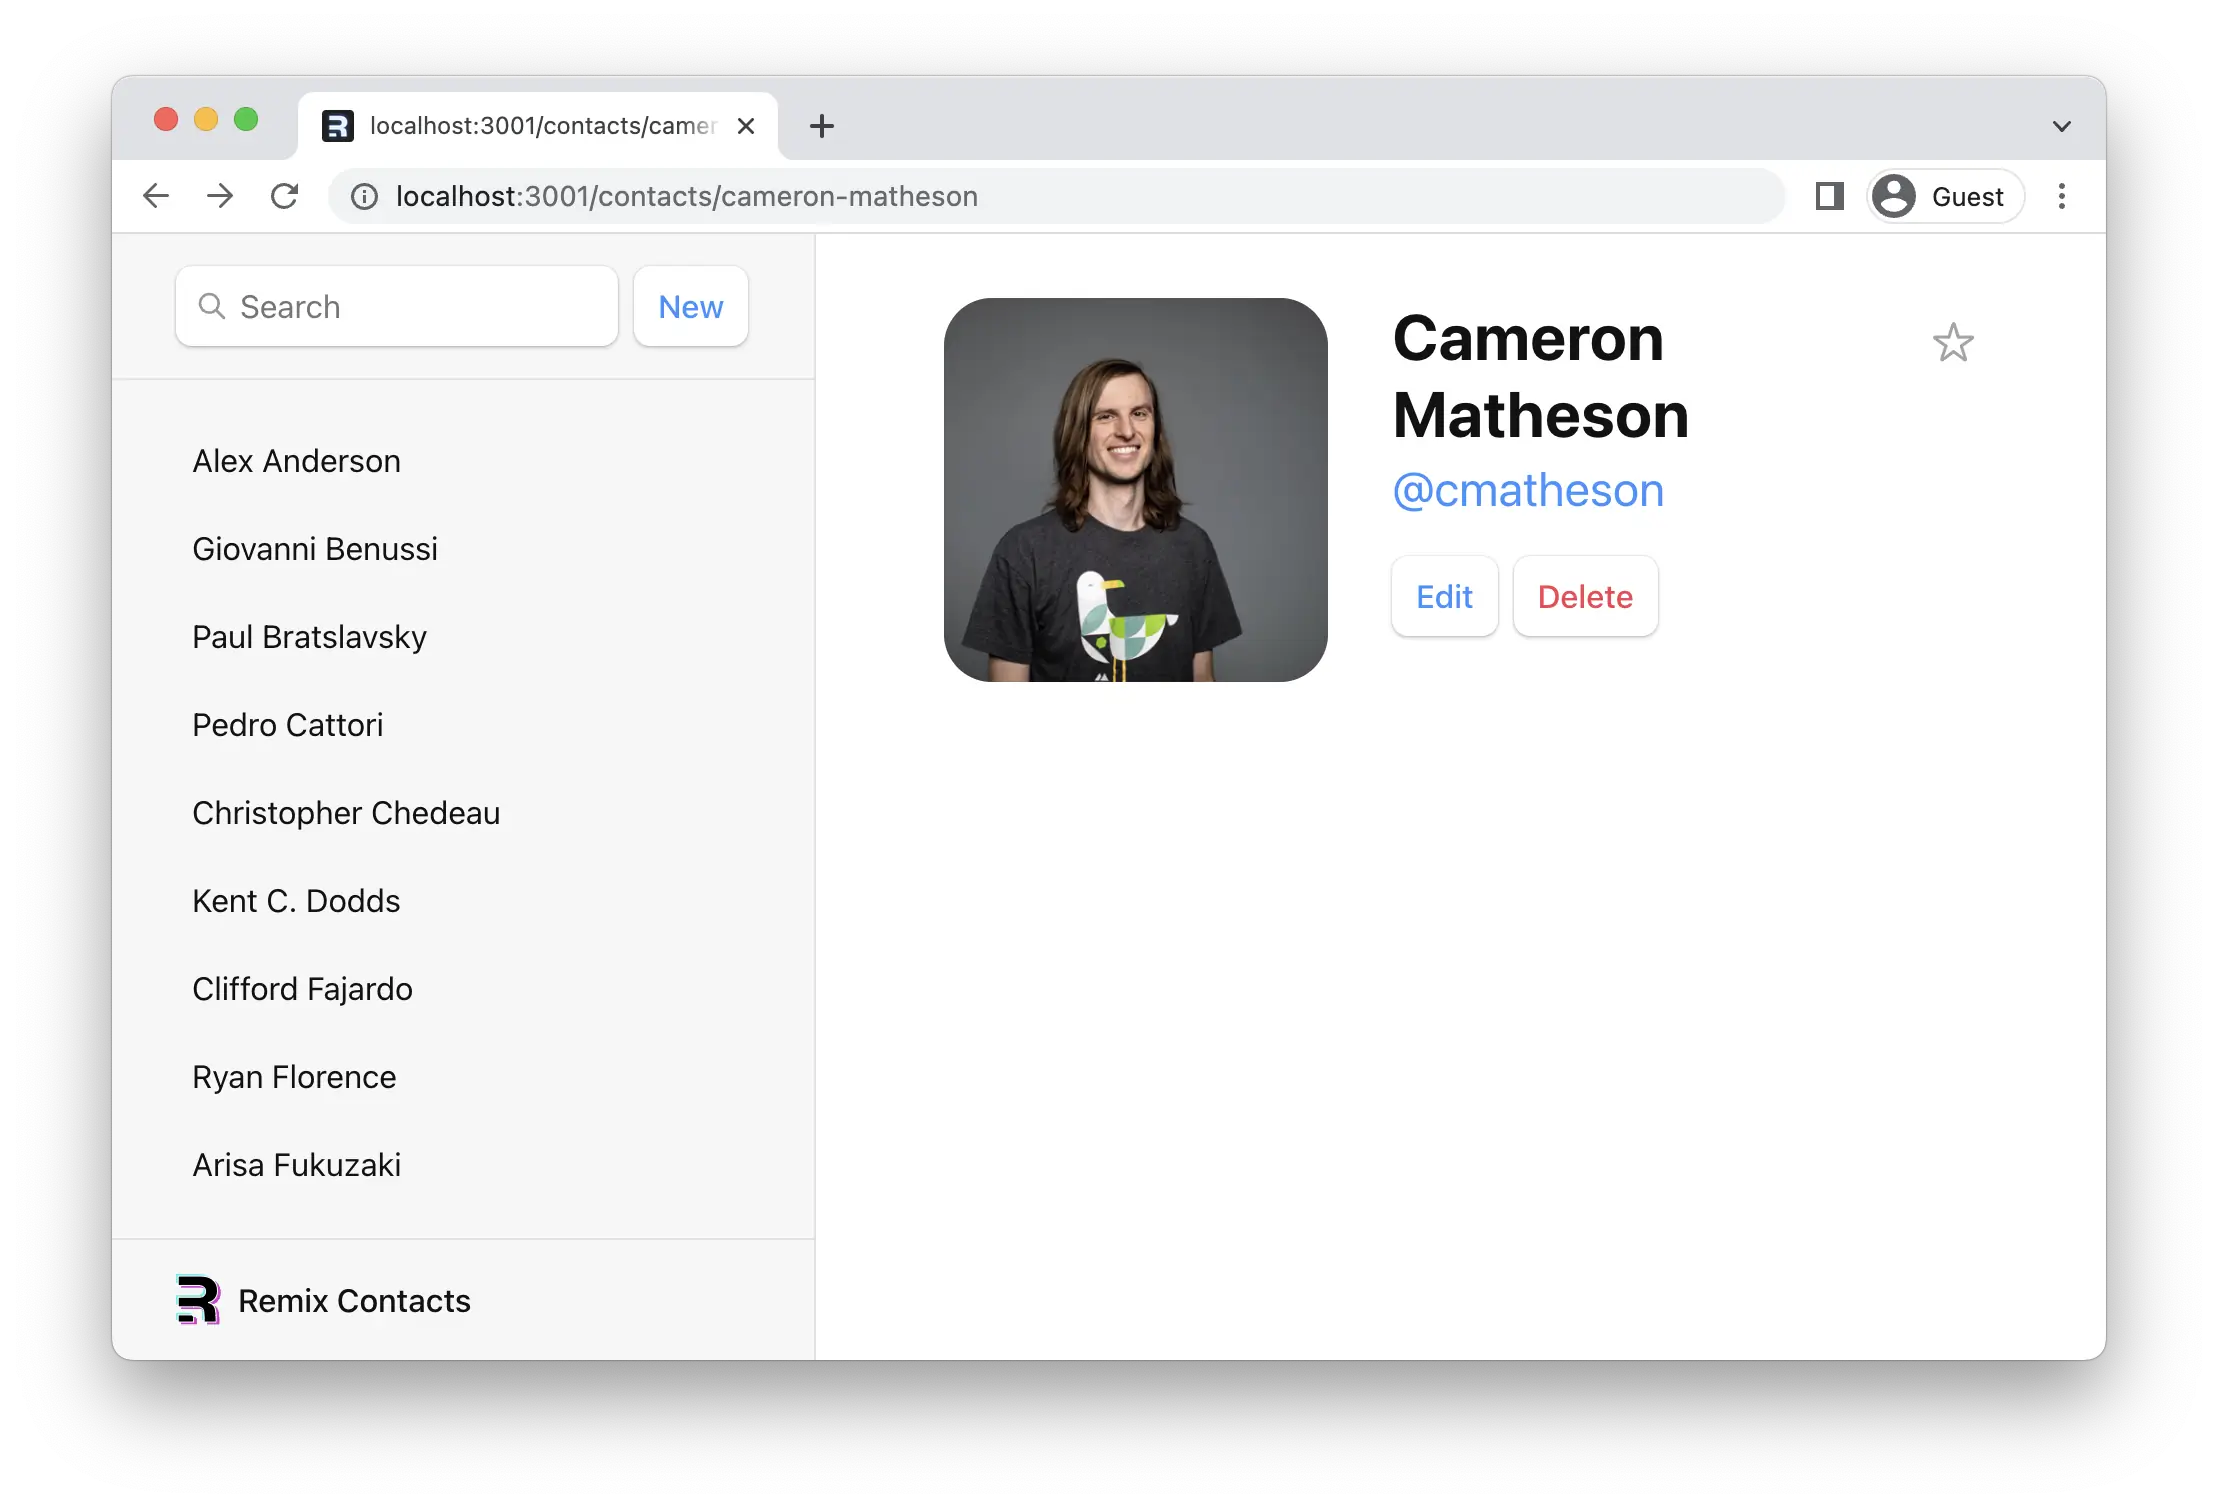
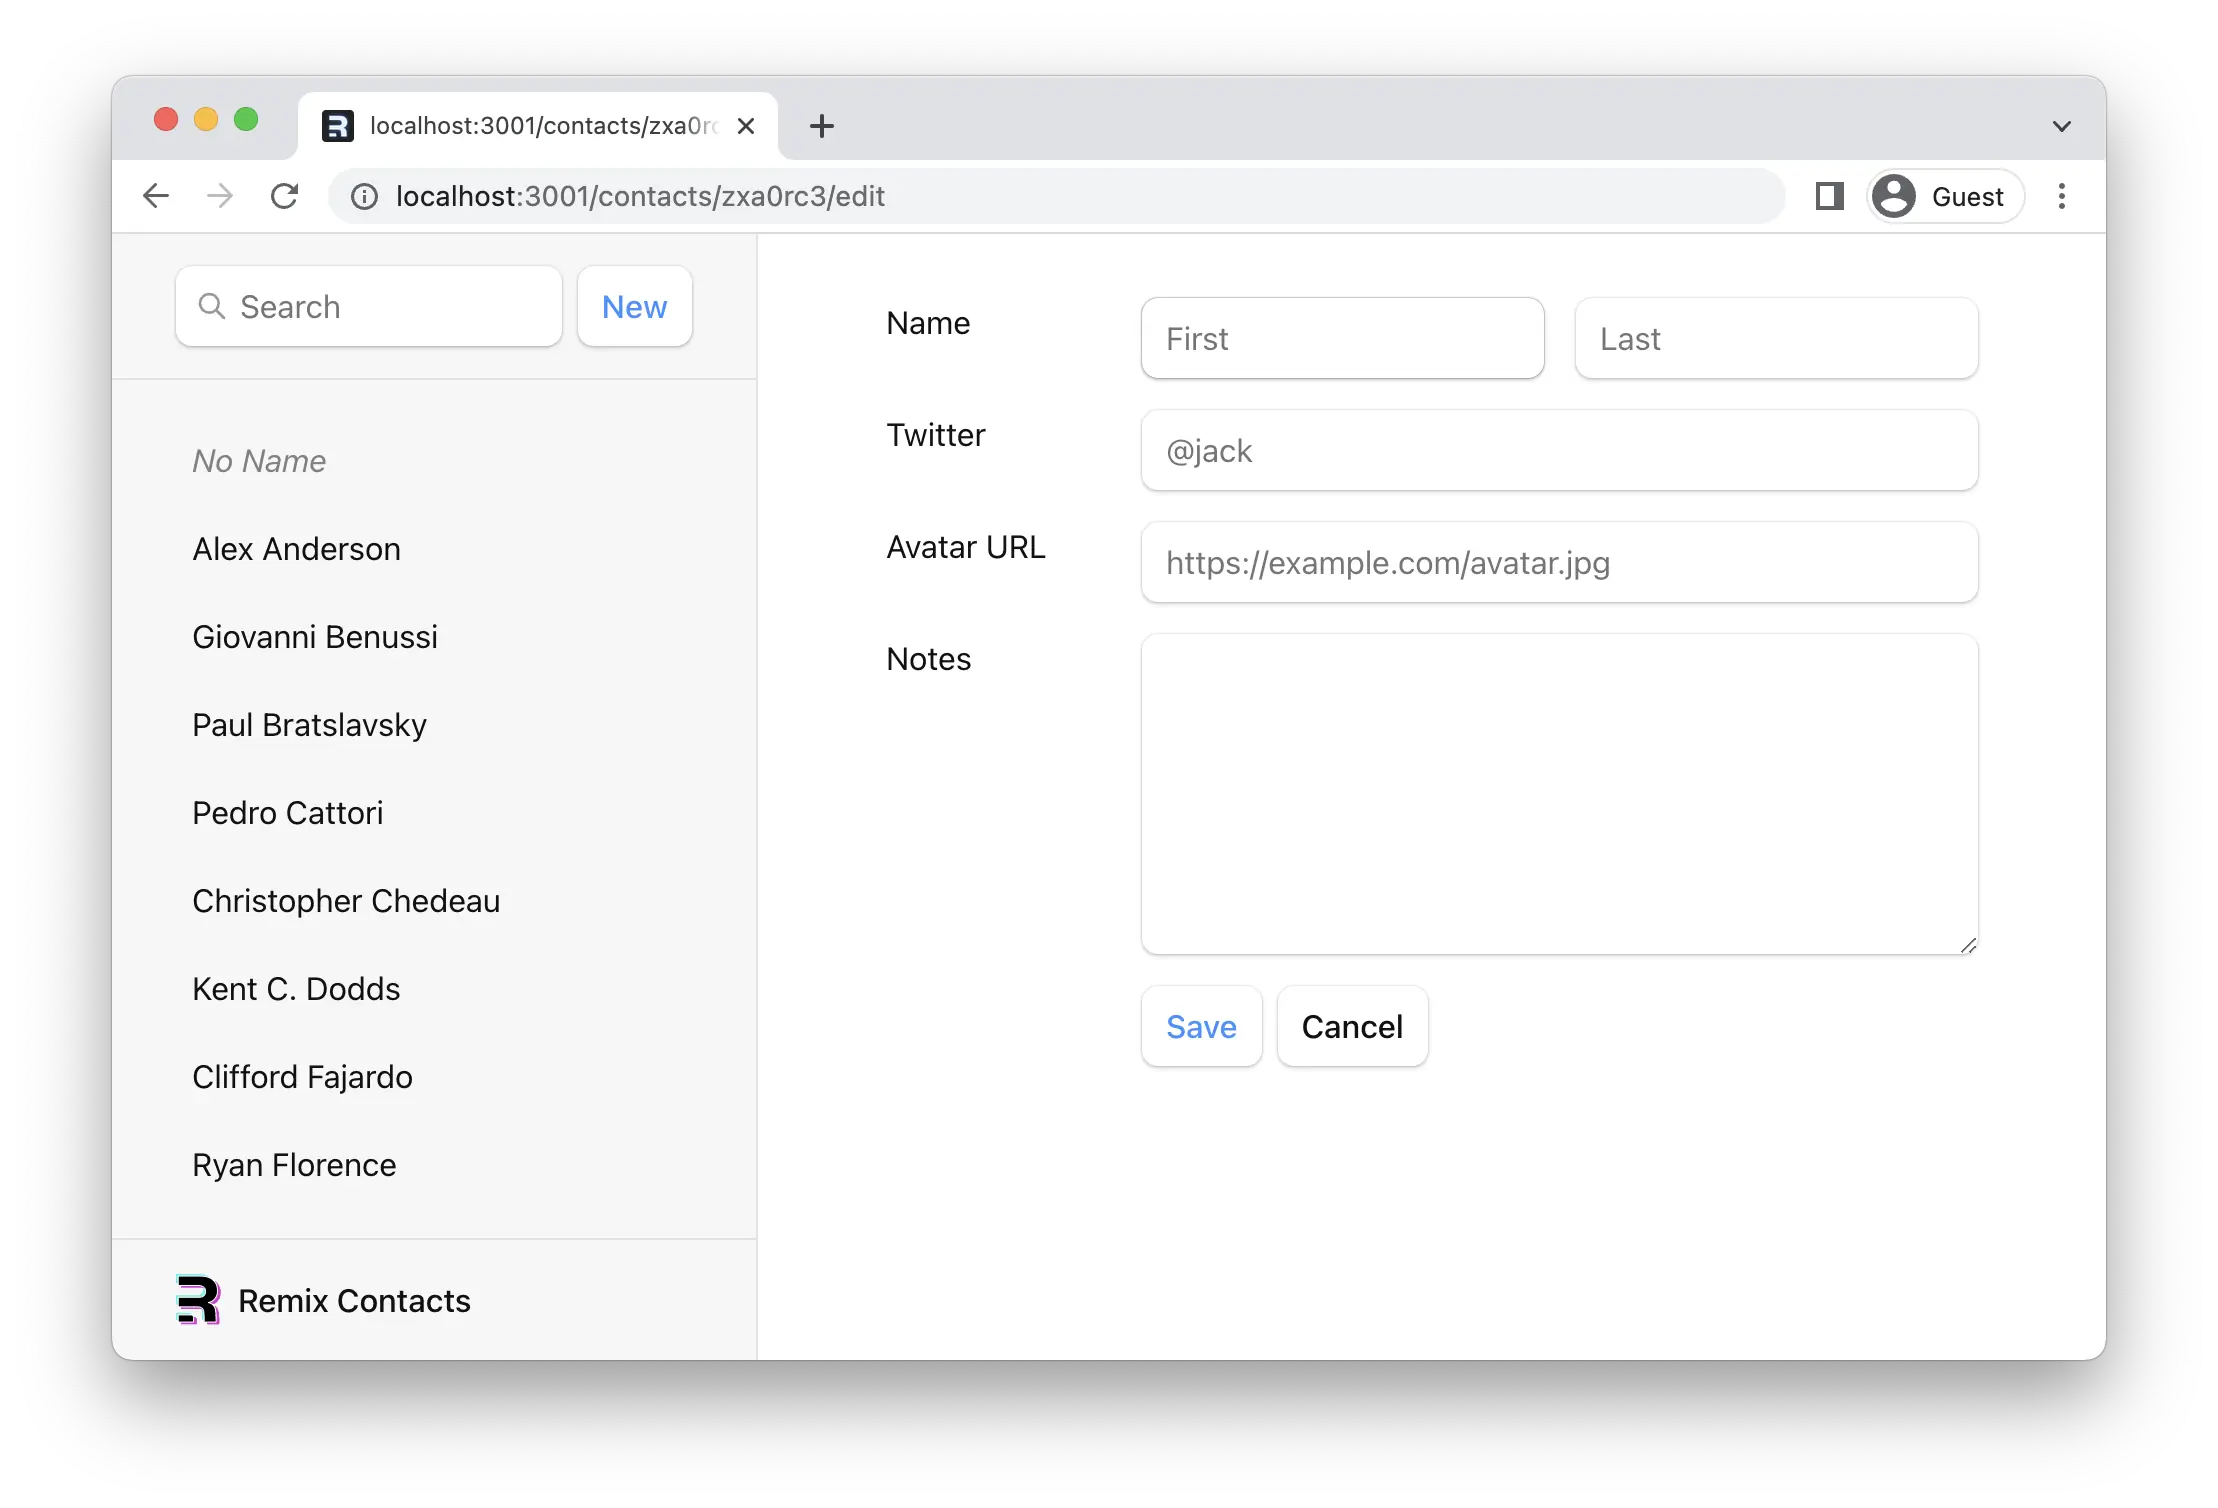
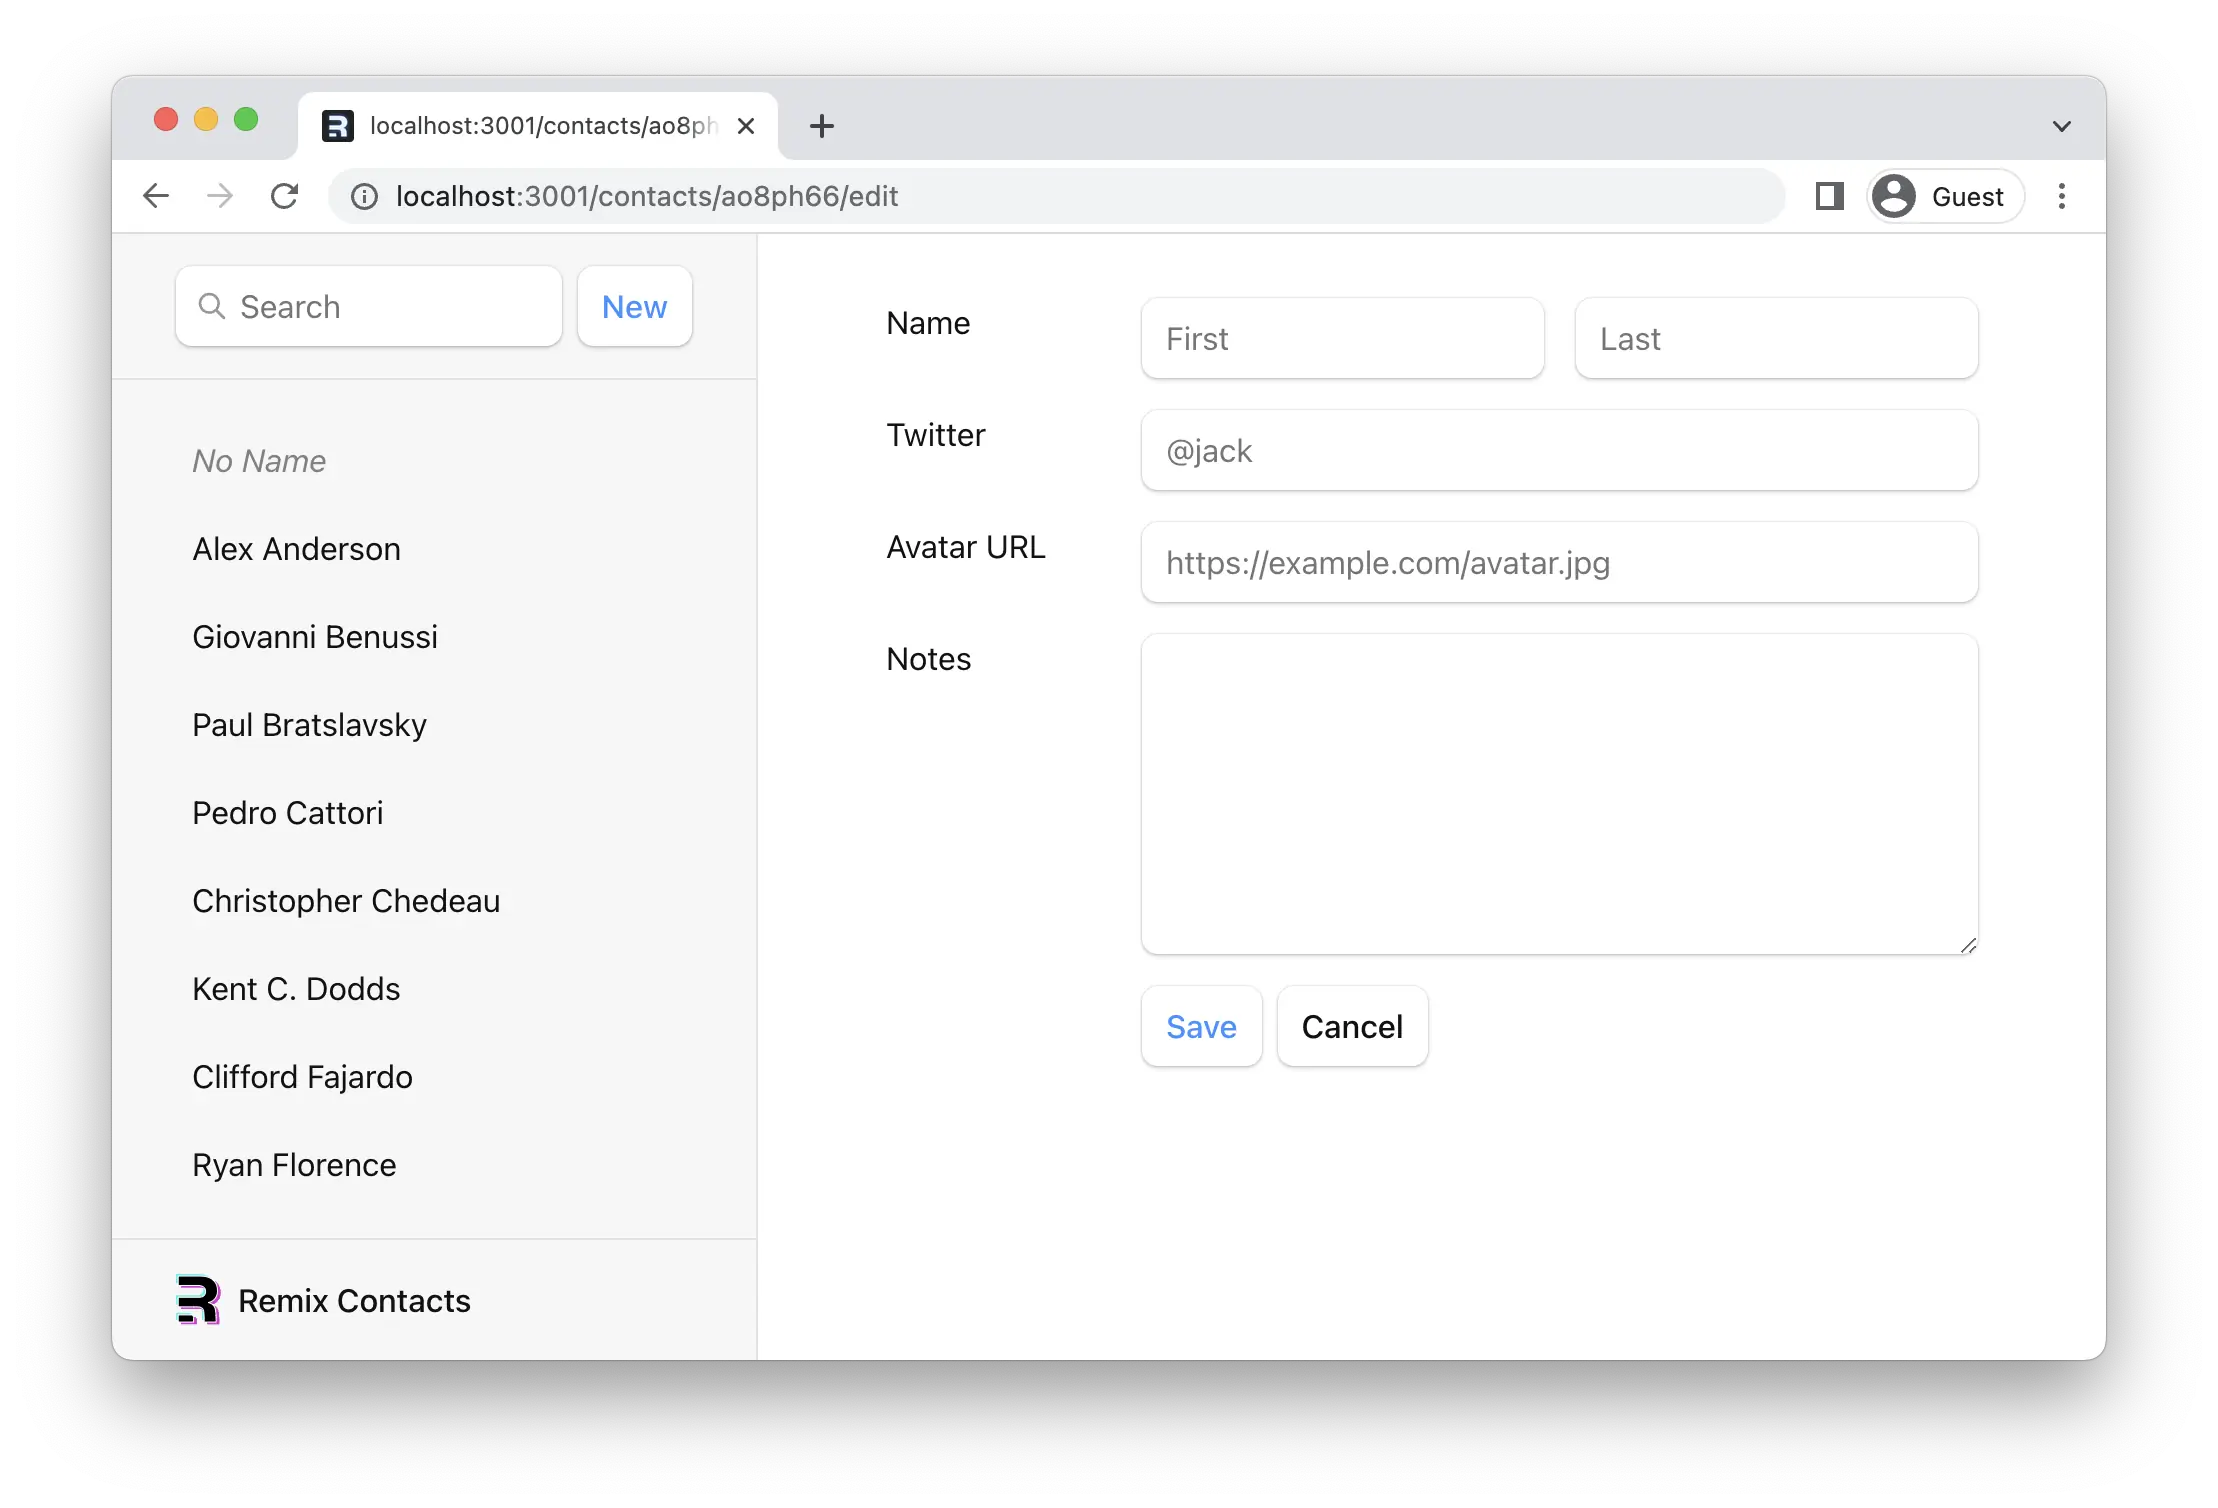
Now click on your new record, then click the "Edit" button. We should see the new route.
Updating Contacts with FormData
The edit route we just created already renders a form. All we need to do is add the action function. Remix will serialize the form, POST it with fetch, and automatically revalidate all the data.
👉 Add an action function to the edit route
import type {
  ActionFunctionArgs,
  LoaderFunctionArgs,
} from "@remix-run/node";
import { redirect } from "@remix-run/node";
// existing imports

import { getContact, updateContact } from "../data";

export const action = async ({
  params,
  request,
}: ActionFunctionArgs) => {
  invariant(params.contactId, "Missing contactId param");
  const formData = await request.formData();
  const updates = Object.fromEntries(formData);
  await updateContact(params.contactId, updates);
  return redirect(`/contacts/${params.contactId}`);
};

// existing code
Fill out the form, hit save, and you should see something like this! (Except easier on the eyes and maybe less hairy.)
Mutation Discussion
😑 It worked, but I have no idea what is going on here...
Let's dig in a bit...
Open up contacts.$contactId_.edit.tsx and look at the form elements. Notice how they each have a name:
<input
  aria-label="First name"
  defaultValue={contact.first}
  name="first"
  placeholder="First"
  type="text"
/>
Without JavaScript, when a form is submitted, the browser will create FormData and set it as the body of the request when it sends it to the server. As mentioned before, Remix prevents that and emulates the browser by sending the request to your action function with fetch instead, including the FormData.
Each field in the form is accessible with formData.get(name). For example, given the input field from above, you could access the first and last names like this:
export const action = async ({
  params,
  request,
}: ActionFunctionArgs) => {
  const formData = await request.formData();
  const firstName = formData.get("first");
  const lastName = formData.get("last");
  // ...
};
Since we have a handful of form fields, we used Object.fromEntries to collect them all into an object, which is exactly what our updateContact function wants.
const updates = Object.fromEntries(formData);
updates.first; // "Some"
updates.last; // "Name"
Aside from the action function, Remix provides none of these APIs we're discussing: request, request.formData, Object.fromEntries are all provided by the web platform.
After we finished the action, note the redirect at the end:
export const action = async ({
  params,
  request,
}: ActionFunctionArgs) => {
  invariant(params.contactId, "Missing contactId param");
  const formData = await request.formData();
  const updates = Object.fromEntries(formData);
  await updateContact(params.contactId, updates);
  return redirect(`/contacts/${params.contactId}`);
};
action and loader functions can both return a Response (makes sense, since they received a Request!). The redirect helper just makes it easier to return a Response that tells the app to change locations.
Without client side routing, if a server redirected after a POST request, the new page would fetch the latest data and render. As we learned before, Remix emulates this model and automatically revalidates the data on the page after the action call. That's why the sidebar automatically updates when we save the form. The extra revalidation code doesn't exist without client side routing, so it doesn't need to exist with client side routing in Remix either!
One last thing. Without JavaScript, the redirect would be a normal redirect. However, with JavaScript it's a client-side redirect, so the user doesn't lose client state like scroll positions or component state.
Redirecting new records to the edit page
Now that we know how to redirect, let's update the action that creates new contacts to redirect to the edit page:
👉 Redirect to the new record's edit page
// existing imports
import { redirect } from "@remix-run/node";
// existing imports

export const action = async () => {
  const contact = await createEmptyContact();
  return redirect(`/contacts/${contact.id}/edit`);
};

// existing code
Now when we click "New", we should end up on the edit page:
Active Link Styling
Now that we have a bunch of records, it's not clear which one we're looking at in the sidebar. We can use NavLink to fix this.
👉 Replace <Link> with <NavLink> in the sidebar
// existing imports
import {
  Form,
  Links,
  Meta,
  NavLink,
  Outlet,
  Scripts,
  ScrollRestoration,
  useLoaderData,
} from "@remix-run/react";

// existing imports and exports

export default function App() {
  const { contacts } = useLoaderData<typeof loader>();

  return (
    <html lang="en">
      {/* existing elements */}
      <body>
        <div id="sidebar">
          {/* existing elements */}
          <ul>
            {contacts.map((contact) => (
              <li key={contact.id}>
                <NavLink
                  className={({ isActive, isPending }) =>
                    isActive
                      ? "active"
                      : isPending
                      ? "pending"
                      : ""
                  }
                  to={`contacts/${contact.id}`}
                >
                  {/* existing elements */}
                </NavLink>
              </li>
            ))}
          </ul>
          {/* existing elements */}
        </div>
        {/* existing elements */}
      </body>
    </html>
  );
}
Note that we are passing a function to className. When the user is at the URL that matches <NavLink to>, then isActive will be true. When it's about to be active (the data is still loading) then isPending will be true. This allows us to easily indicate where the user is and also provide immediate feedback when links are clicked, but data needs to be loaded.

Global Pending UI
As the user navigates the app, Remix will leave the old page up as data is loading for the next page. You may have noticed the app feels a little unresponsive as you click between the list. Let's provide the user with some feedback so the app doesn't feel unresponsive.
Remix is managing all the states behind the scenes and reveals the pieces you need to build dynamic web apps. In this case, we'll use the useNavigation hook.
👉 Use useNavigation to add global pending UI
// existing imports
import {
  Form,
  Links,
  Meta,
  NavLink,
  Outlet,
  Scripts,
  ScrollRestoration,
  useLoaderData,
  useNavigation,
} from "@remix-run/react";

// existing imports and exports

export default function App() {
  const { contacts } = useLoaderData<typeof loader>();
  const navigation = useNavigation();

  return (
    <html lang="en">
      {/* existing elements */}
      <body>
        {/* existing elements */}
        <div
          className={
            navigation.state === "loading" ? "loading" : ""
          }
          id="detail"
        >
          <Outlet />
        </div>
        {/* existing elements */}
      </body>
    </html>
  );
}
useNavigation returns the current navigation state: it can be one of "idle", "loading" or "submitting".
In our case, we add a "loading" class to the main part of the app if we're not idle. The CSS then adds a nice fade after a short delay (to avoid flickering the UI for fast loads). You could do anything you want, though, like show a spinner or loading bar across the top.
Deleting Records
If we review code in the contact route, we can find the delete button looks like this:
<Form
  action="destroy"
  method="post"
  onSubmit={(event) => {
    const response = confirm(
      "Please confirm you want to delete this record."
    );
    if (!response) {
      event.preventDefault();
    }
  }}
>
  <button type="submit">Delete</button>
</Form>
Note the action points to "destroy". Like <Link to>, <Form action> can take a relative value. Since the form is rendered in contacts.$contactId.tsx, then a relative action with destroy will submit the form to contacts.$contactId.destroy when clicked.
At this point you should know everything you need to know to make the delete button work. Maybe give it a try before moving on? You'll need:
- A new route
- An
actionat that route deleteContactfromapp/data.tsredirectto somewhere after
👉 Create the "destroy" route module
touch app/routes/contacts.\$contactId_.destroy.tsx
👉 Add the destroy action
import type { ActionFunctionArgs } from "@remix-run/node";
import { redirect } from "@remix-run/node";
import invariant from "tiny-invariant";

import { deleteContact } from "../data";

export const action = async ({
  params,
}: ActionFunctionArgs) => {
  invariant(params.contactId, "Missing contactId param");
  await deleteContact(params.contactId);
  return redirect("/");
};
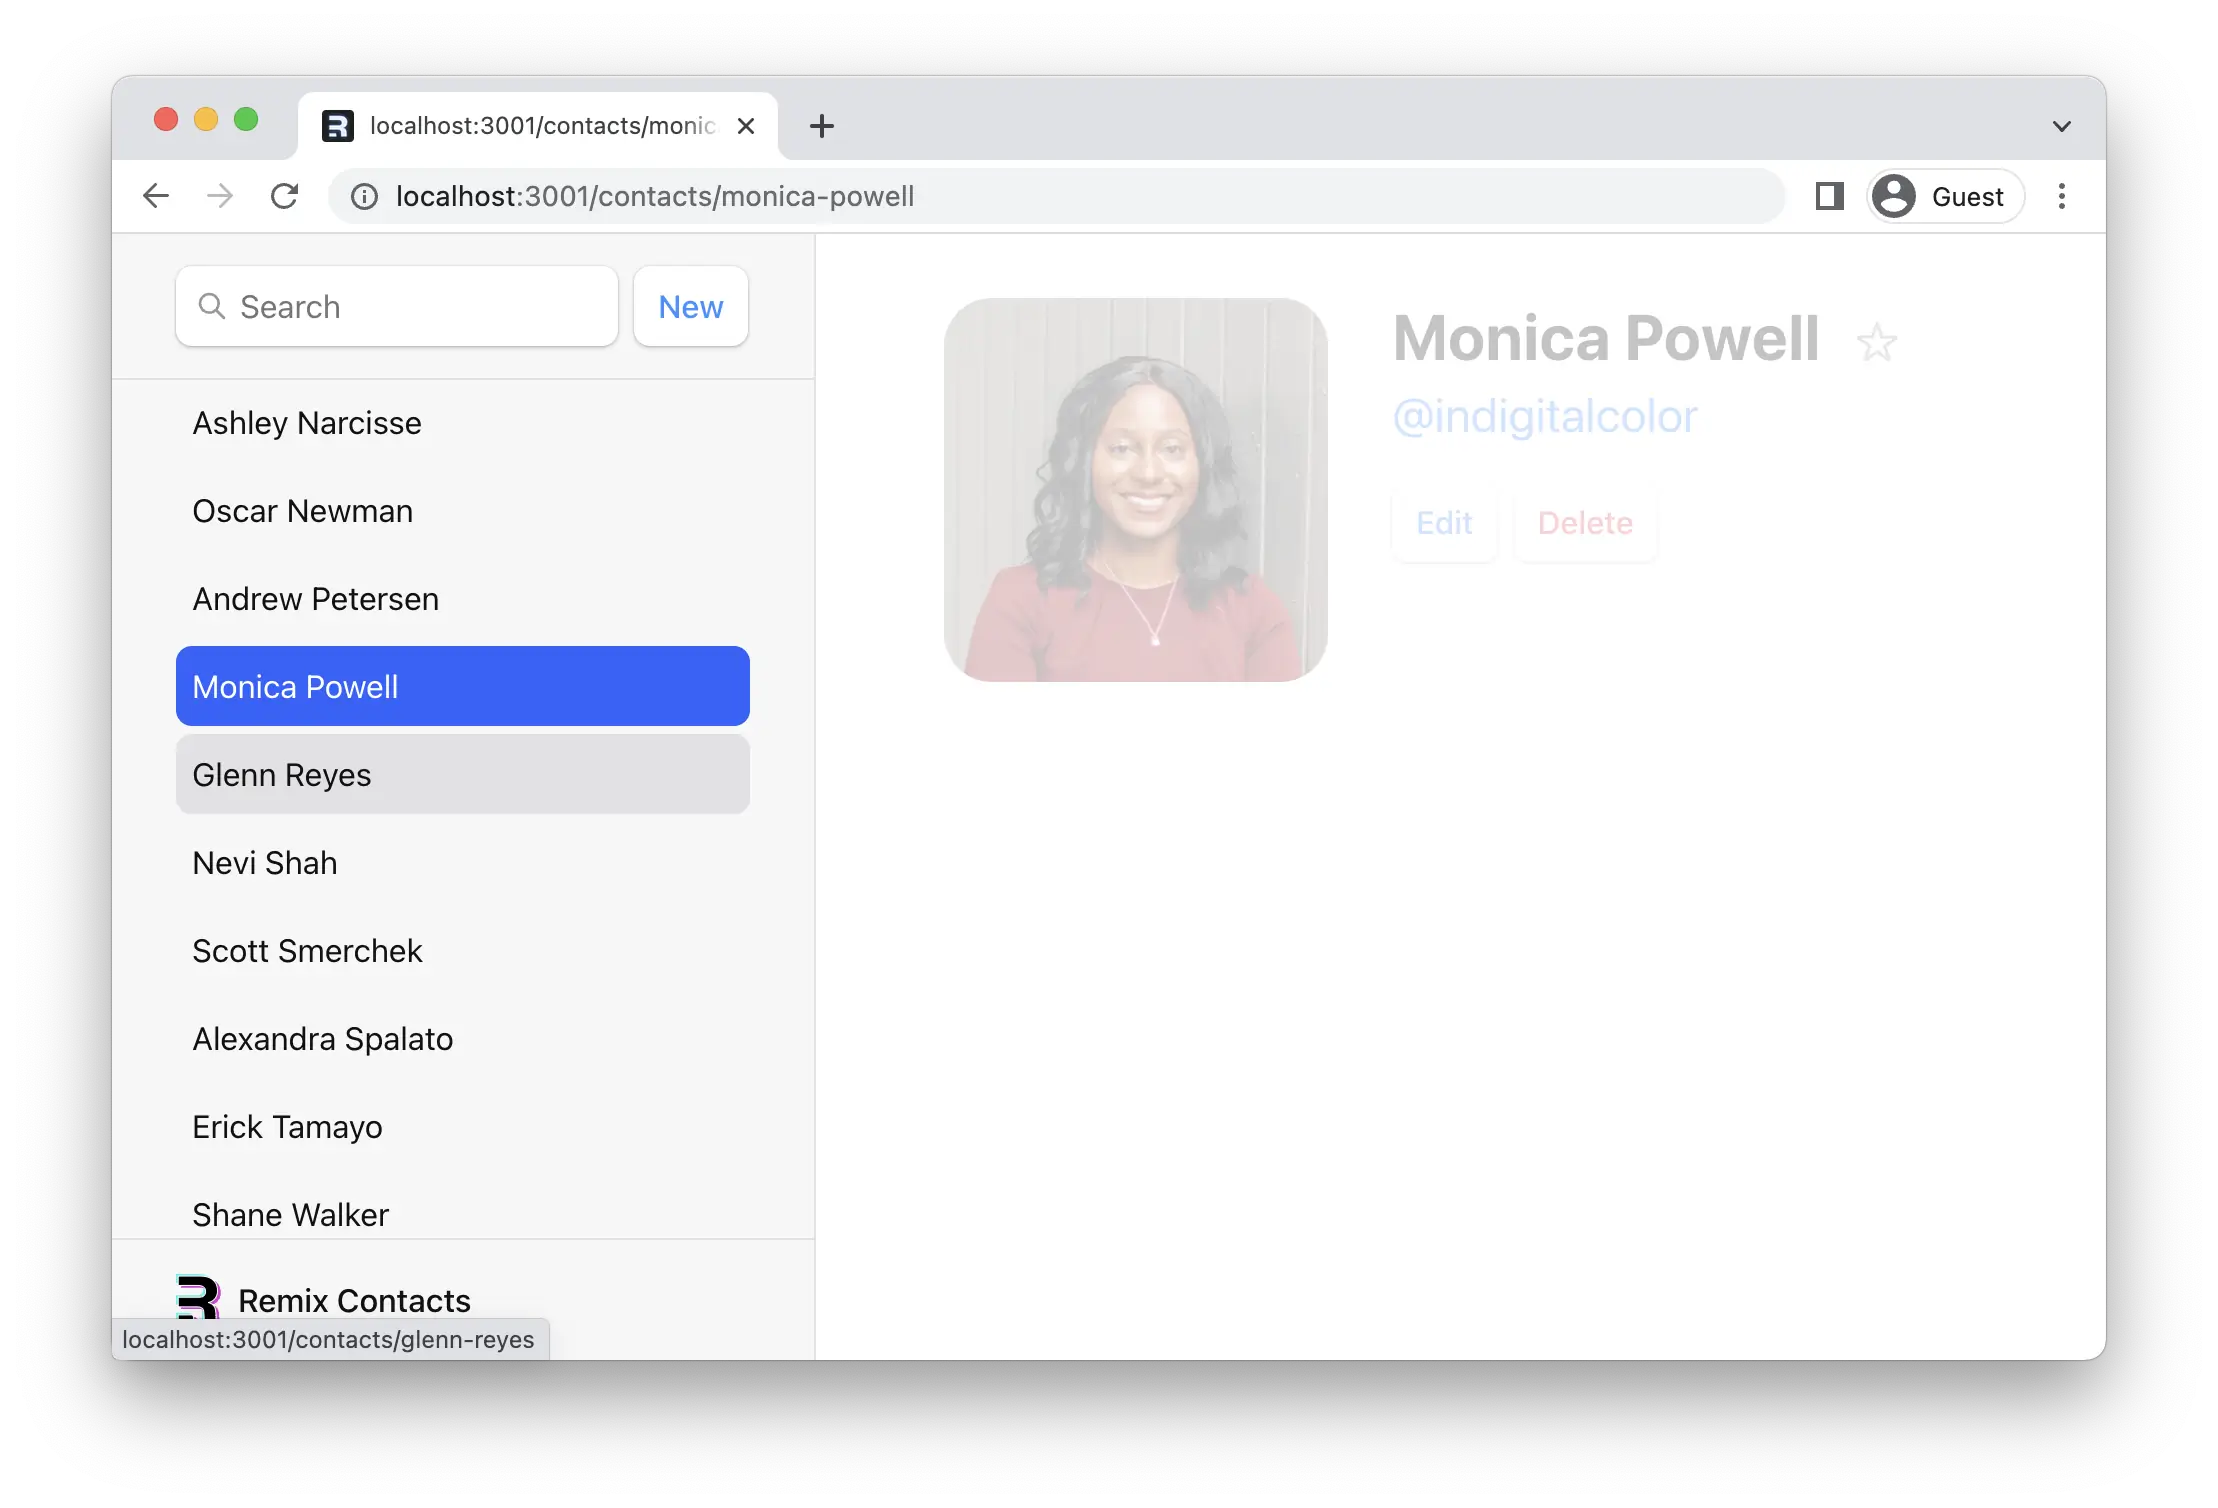
Alright, navigate to a record and click the "Delete" button. It works!
😅 I'm still confused why this all works
When the user clicks the submit button:
<Form>prevents the default browser behavior of sending a new documentPOSTrequest to the server, but instead emulates the browser by creating aPOSTrequest with client side routing andfetch- The
<Form action="destroy">matches the new route atcontacts.$contactId_.destroy.tsxand sends it the request - After the
actionredirects, Remix calls all theloaders for the data on the page to get the latest values (this is "revalidation").useLoaderDatareturns new values and causes the components to update!
Add a Form, add an action, Remix does the rest.
Index Routes
When we load up the app, you'll notice a big blank page on the right side of our list.
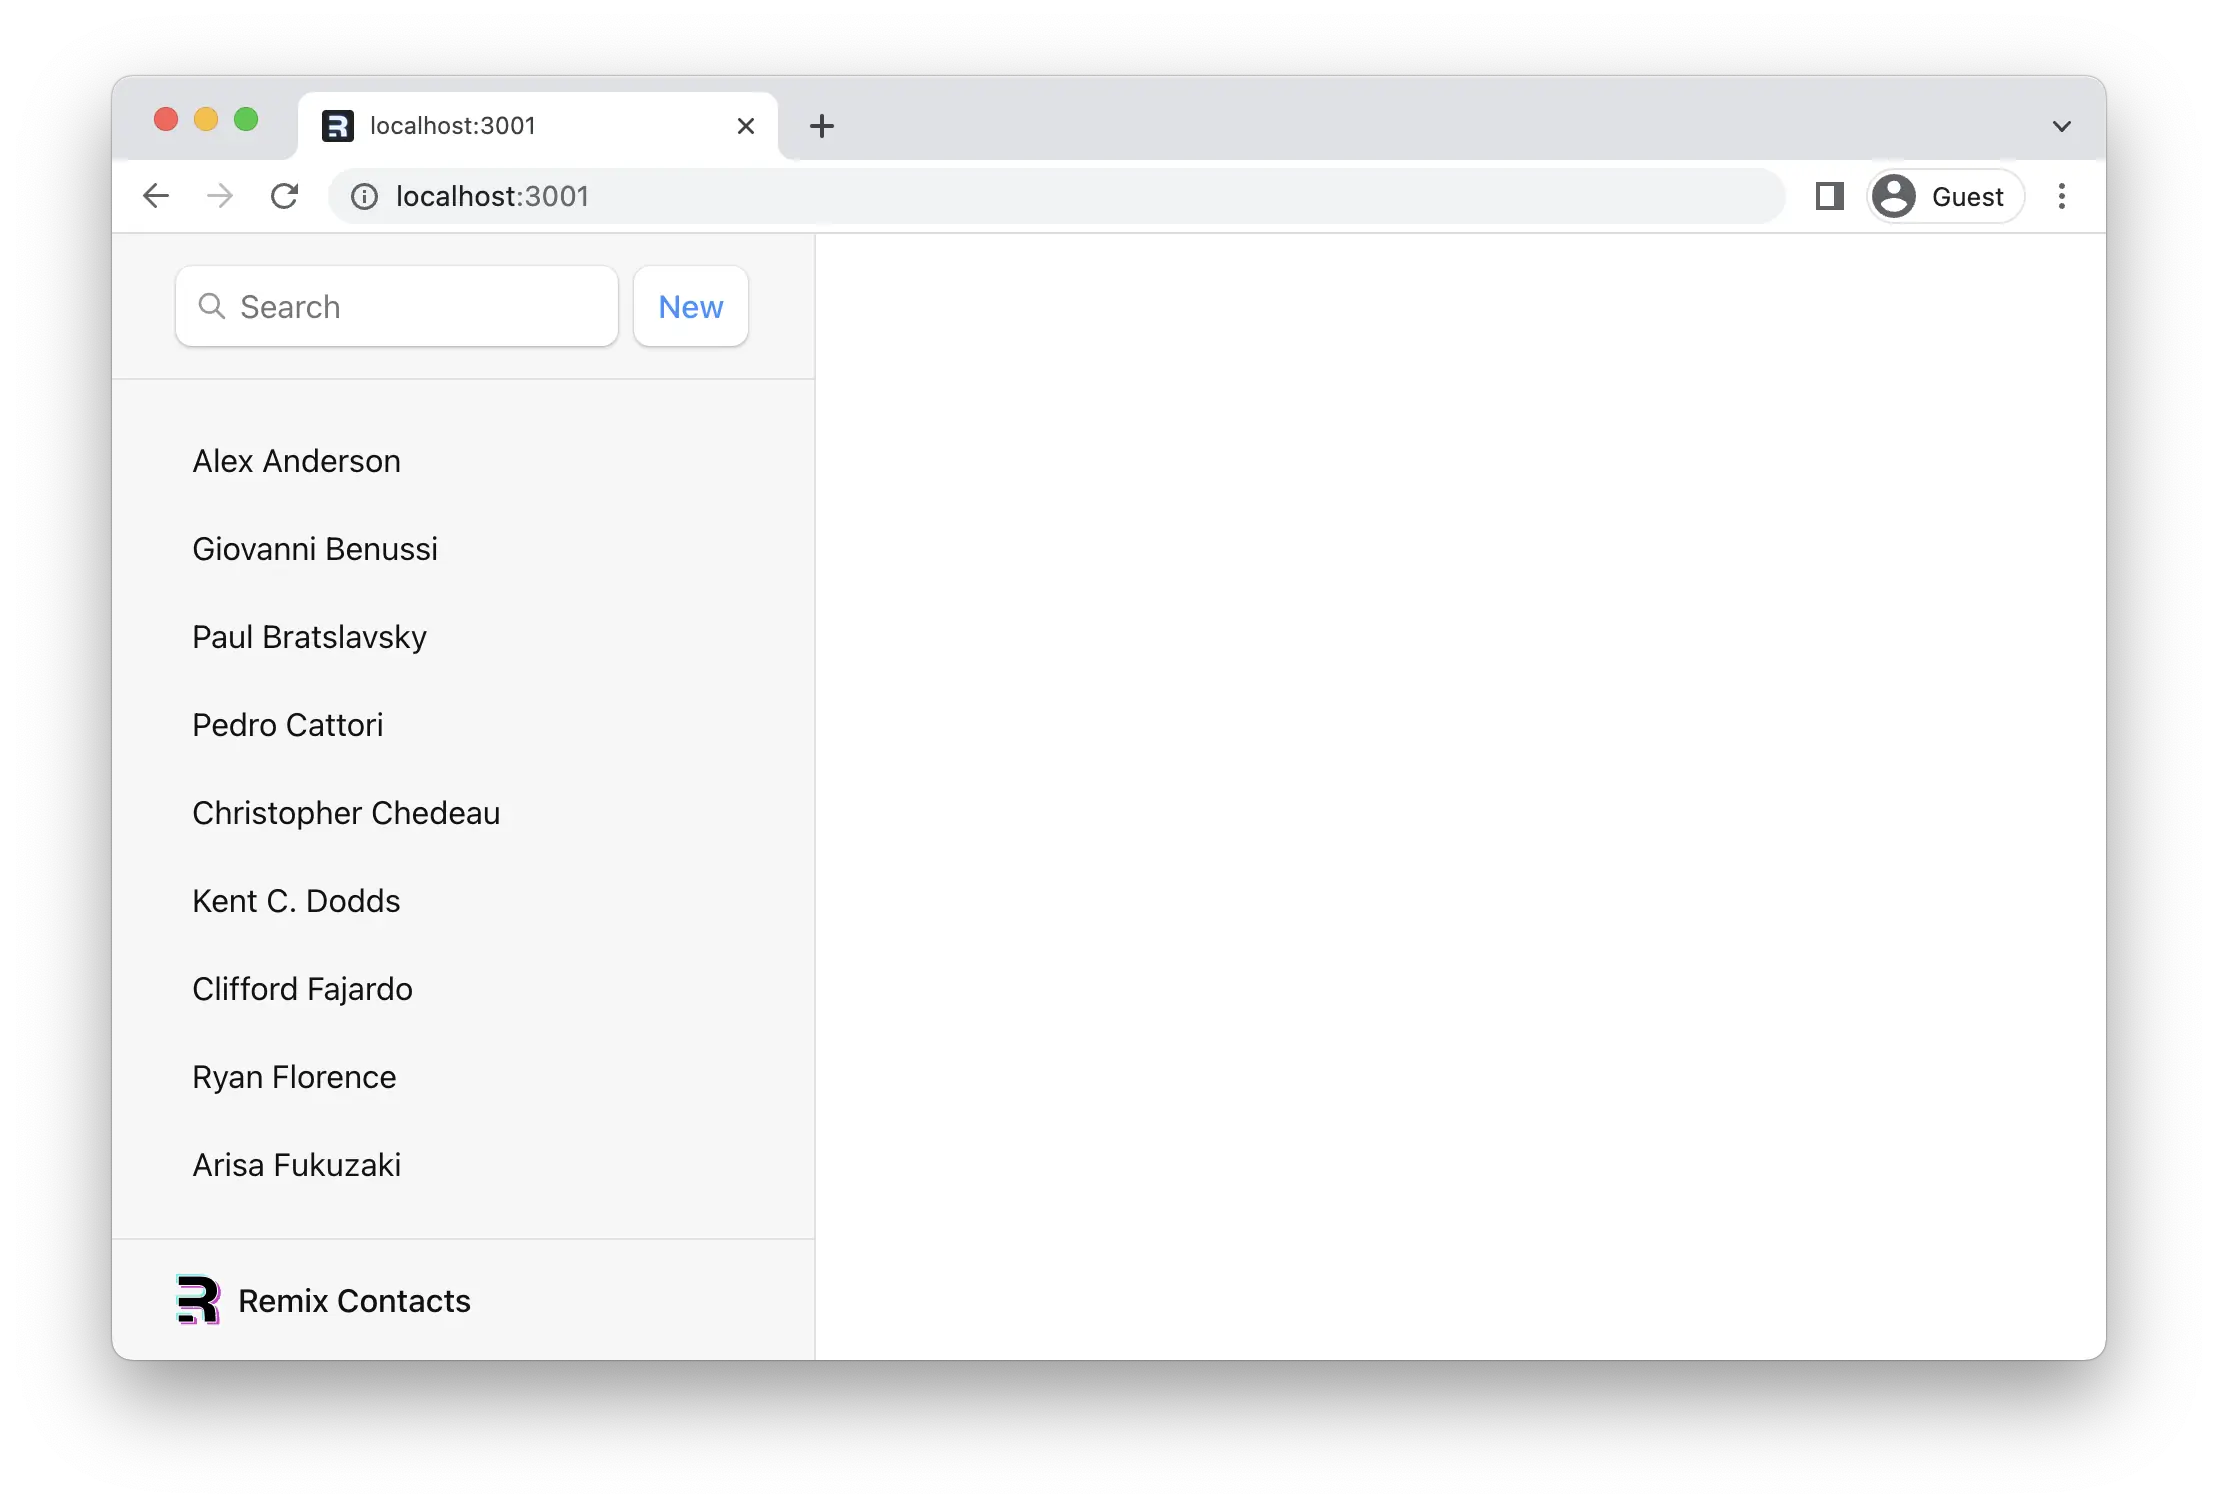
When a route has children, and you're at the parent route's path, the <Outlet> has nothing to render because no children match. You can think of index routes as the default child route to fill in that space.
👉 Create an index route for the root route
touch app/routes/_index.tsx
👉 Fill in the index component's elements
Feel free to copy/paste, nothing special here.
export default function Index() {
  return (
    <p id="index-page">
      This is a demo for Remix.
      <br />
      Check out{" "}
      <a href="https://remix.run">the docs at remix.run</a>.
    </p>
  );
}
The route name _index is special. It tells Remix to match and render this route when the user is at the parent route's exact path, so there are no other child routes to render in the <Outlet />.
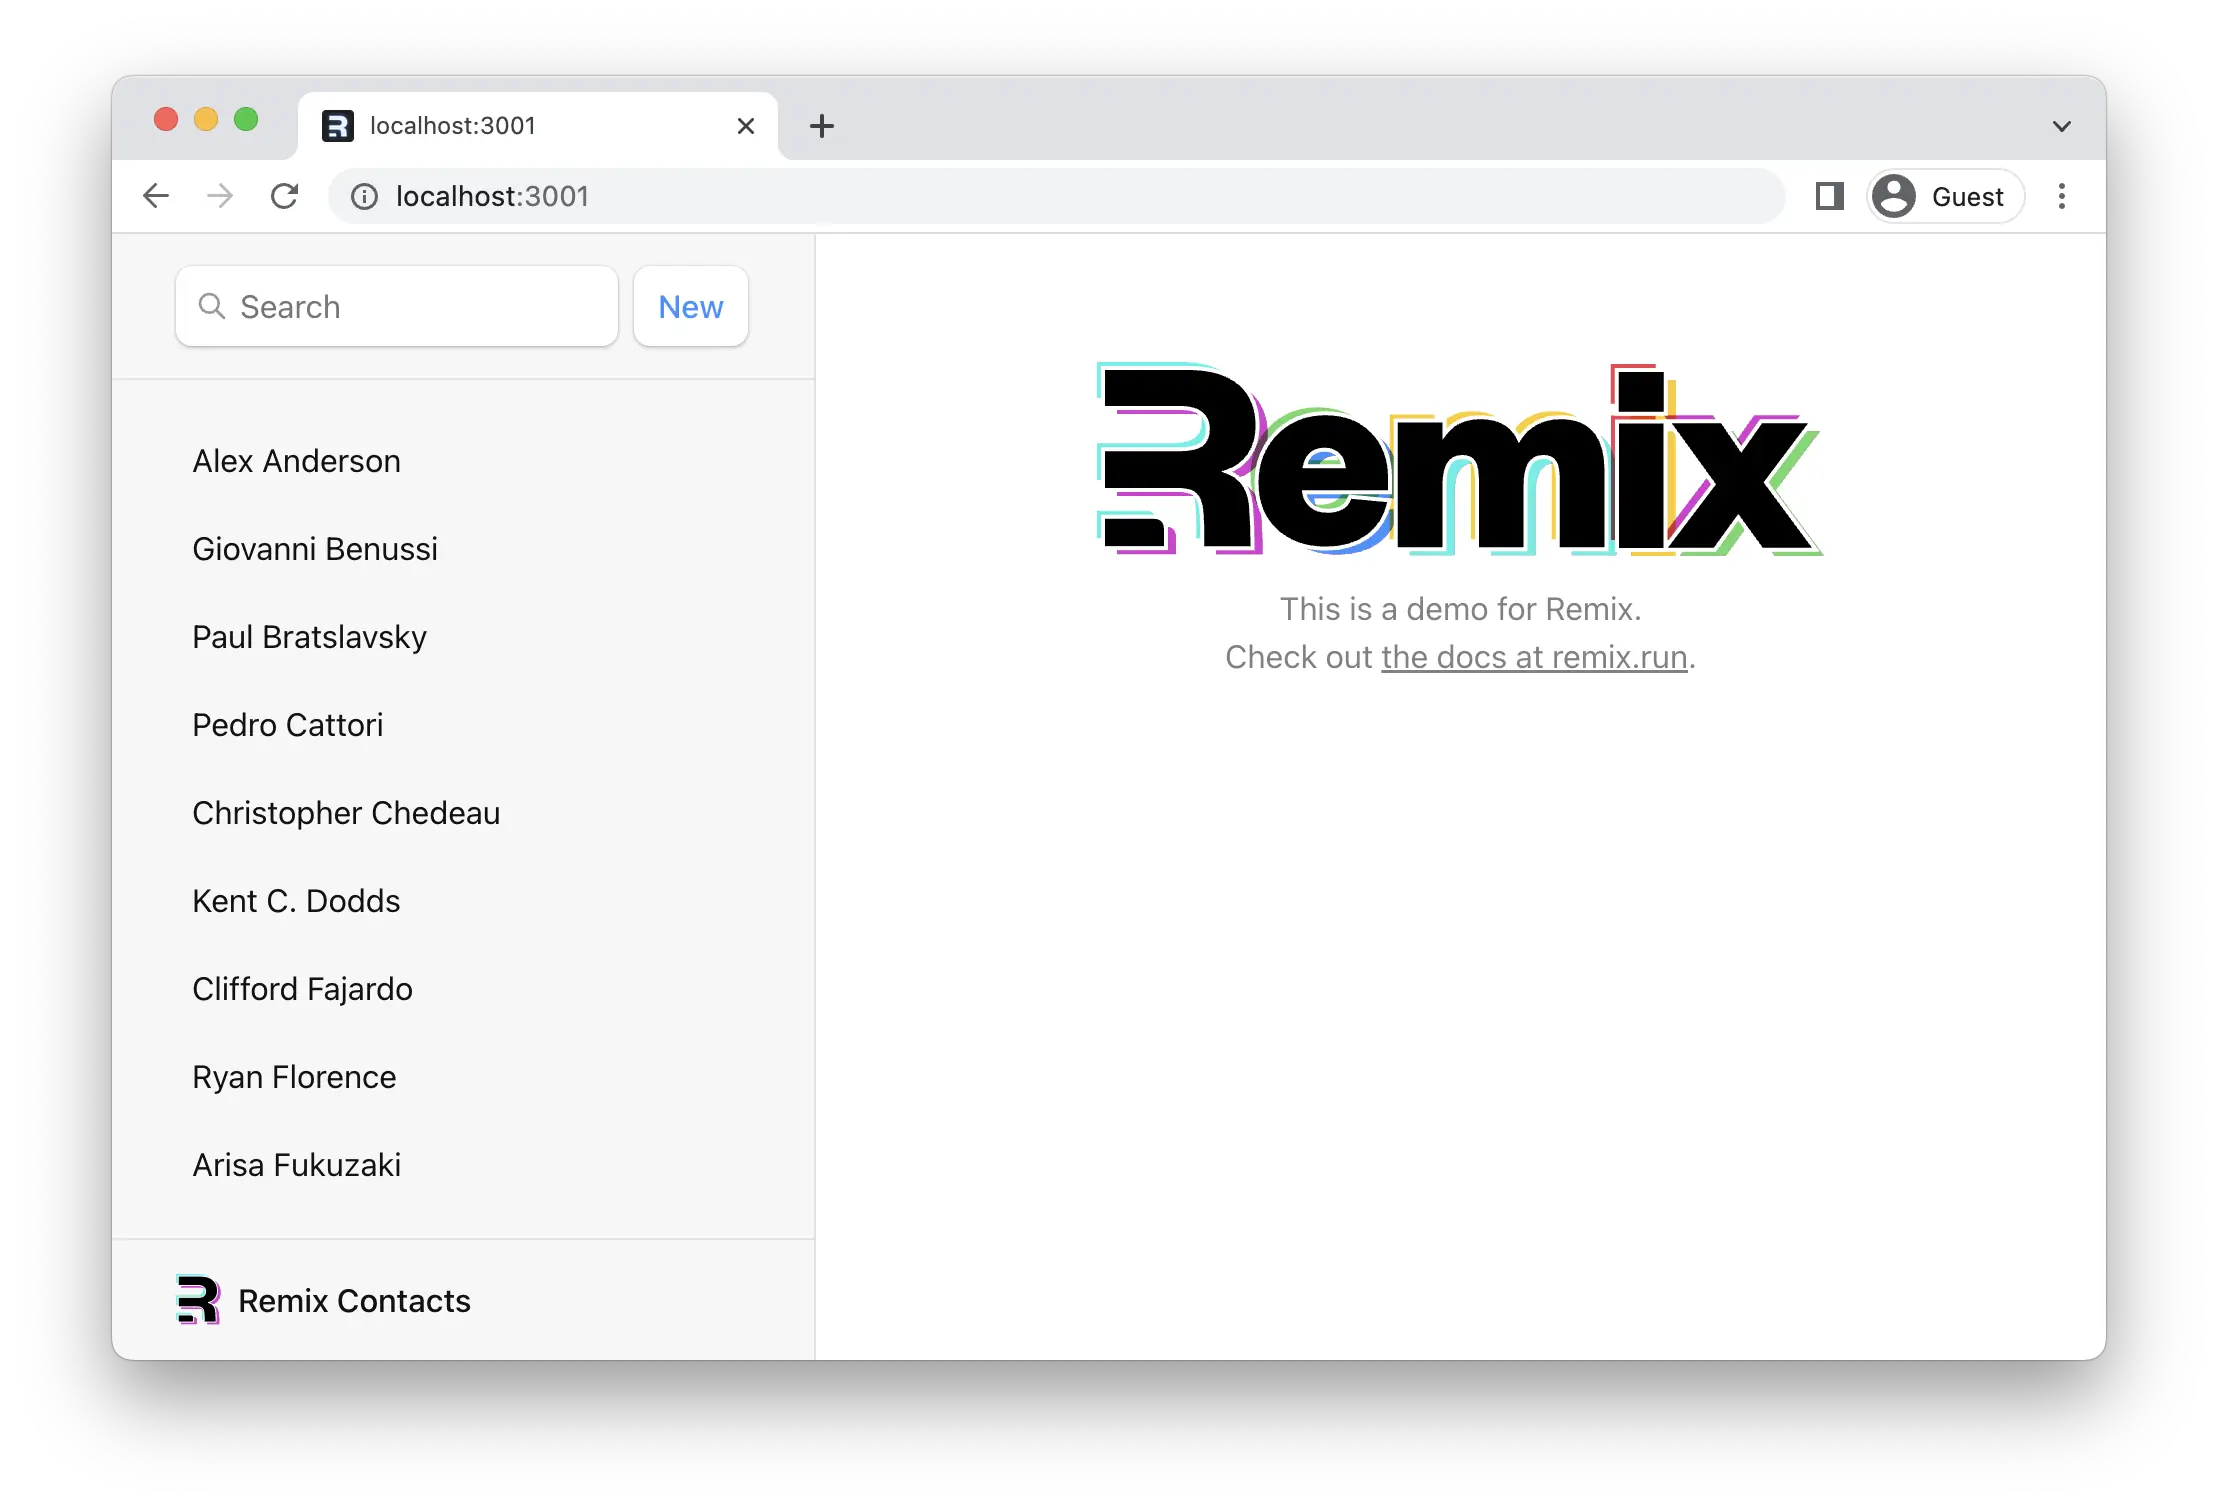
Voilà! No more blank space. It's common to put dashboards, stats, feeds, etc. at index routes. They can participate in data loading as well.
Cancel Button
On the edit page we've got a cancel button that doesn't do anything yet. We'd like it to do the same thing as the browser's back button.
We'll need a click handler on the button as well as useNavigate.
👉 Add the cancel button click handler with useNavigate
// existing imports
import {
  Form,
  useLoaderData,
  useNavigate,
} from "@remix-run/react";
// existing imports and exports

export default function EditContact() {
  const { contact } = useLoaderData<typeof loader>();
  const navigate = useNavigate();

  return (
    <Form key={contact.id} id="contact-form" method="post">
      {/* existing elements */}
      <p>
        <button type="submit">Save</button>
        <button onClick={() => navigate(-1)} type="button">
          Cancel
        </button>
      </p>
    </Form>
  );
}
Now when the user clicks "Cancel", they'll be sent back one entry in the browser's history.
🧐 Why is there no
event.preventDefault()on the button?
A <button type="button">, while seemingly redundant, is the HTML way of preventing a button from submitting its form.
Two more features to go. We're on the home stretch!
URLSearchParams and GET Submissions
All of our interactive UI so far have been either links that change the URL or forms that post data to action functions. The search field is interesting because it's a mix of both: it's a form, but it only changes the URL, it doesn't change data.
Let's see what happens when we submit the search form:
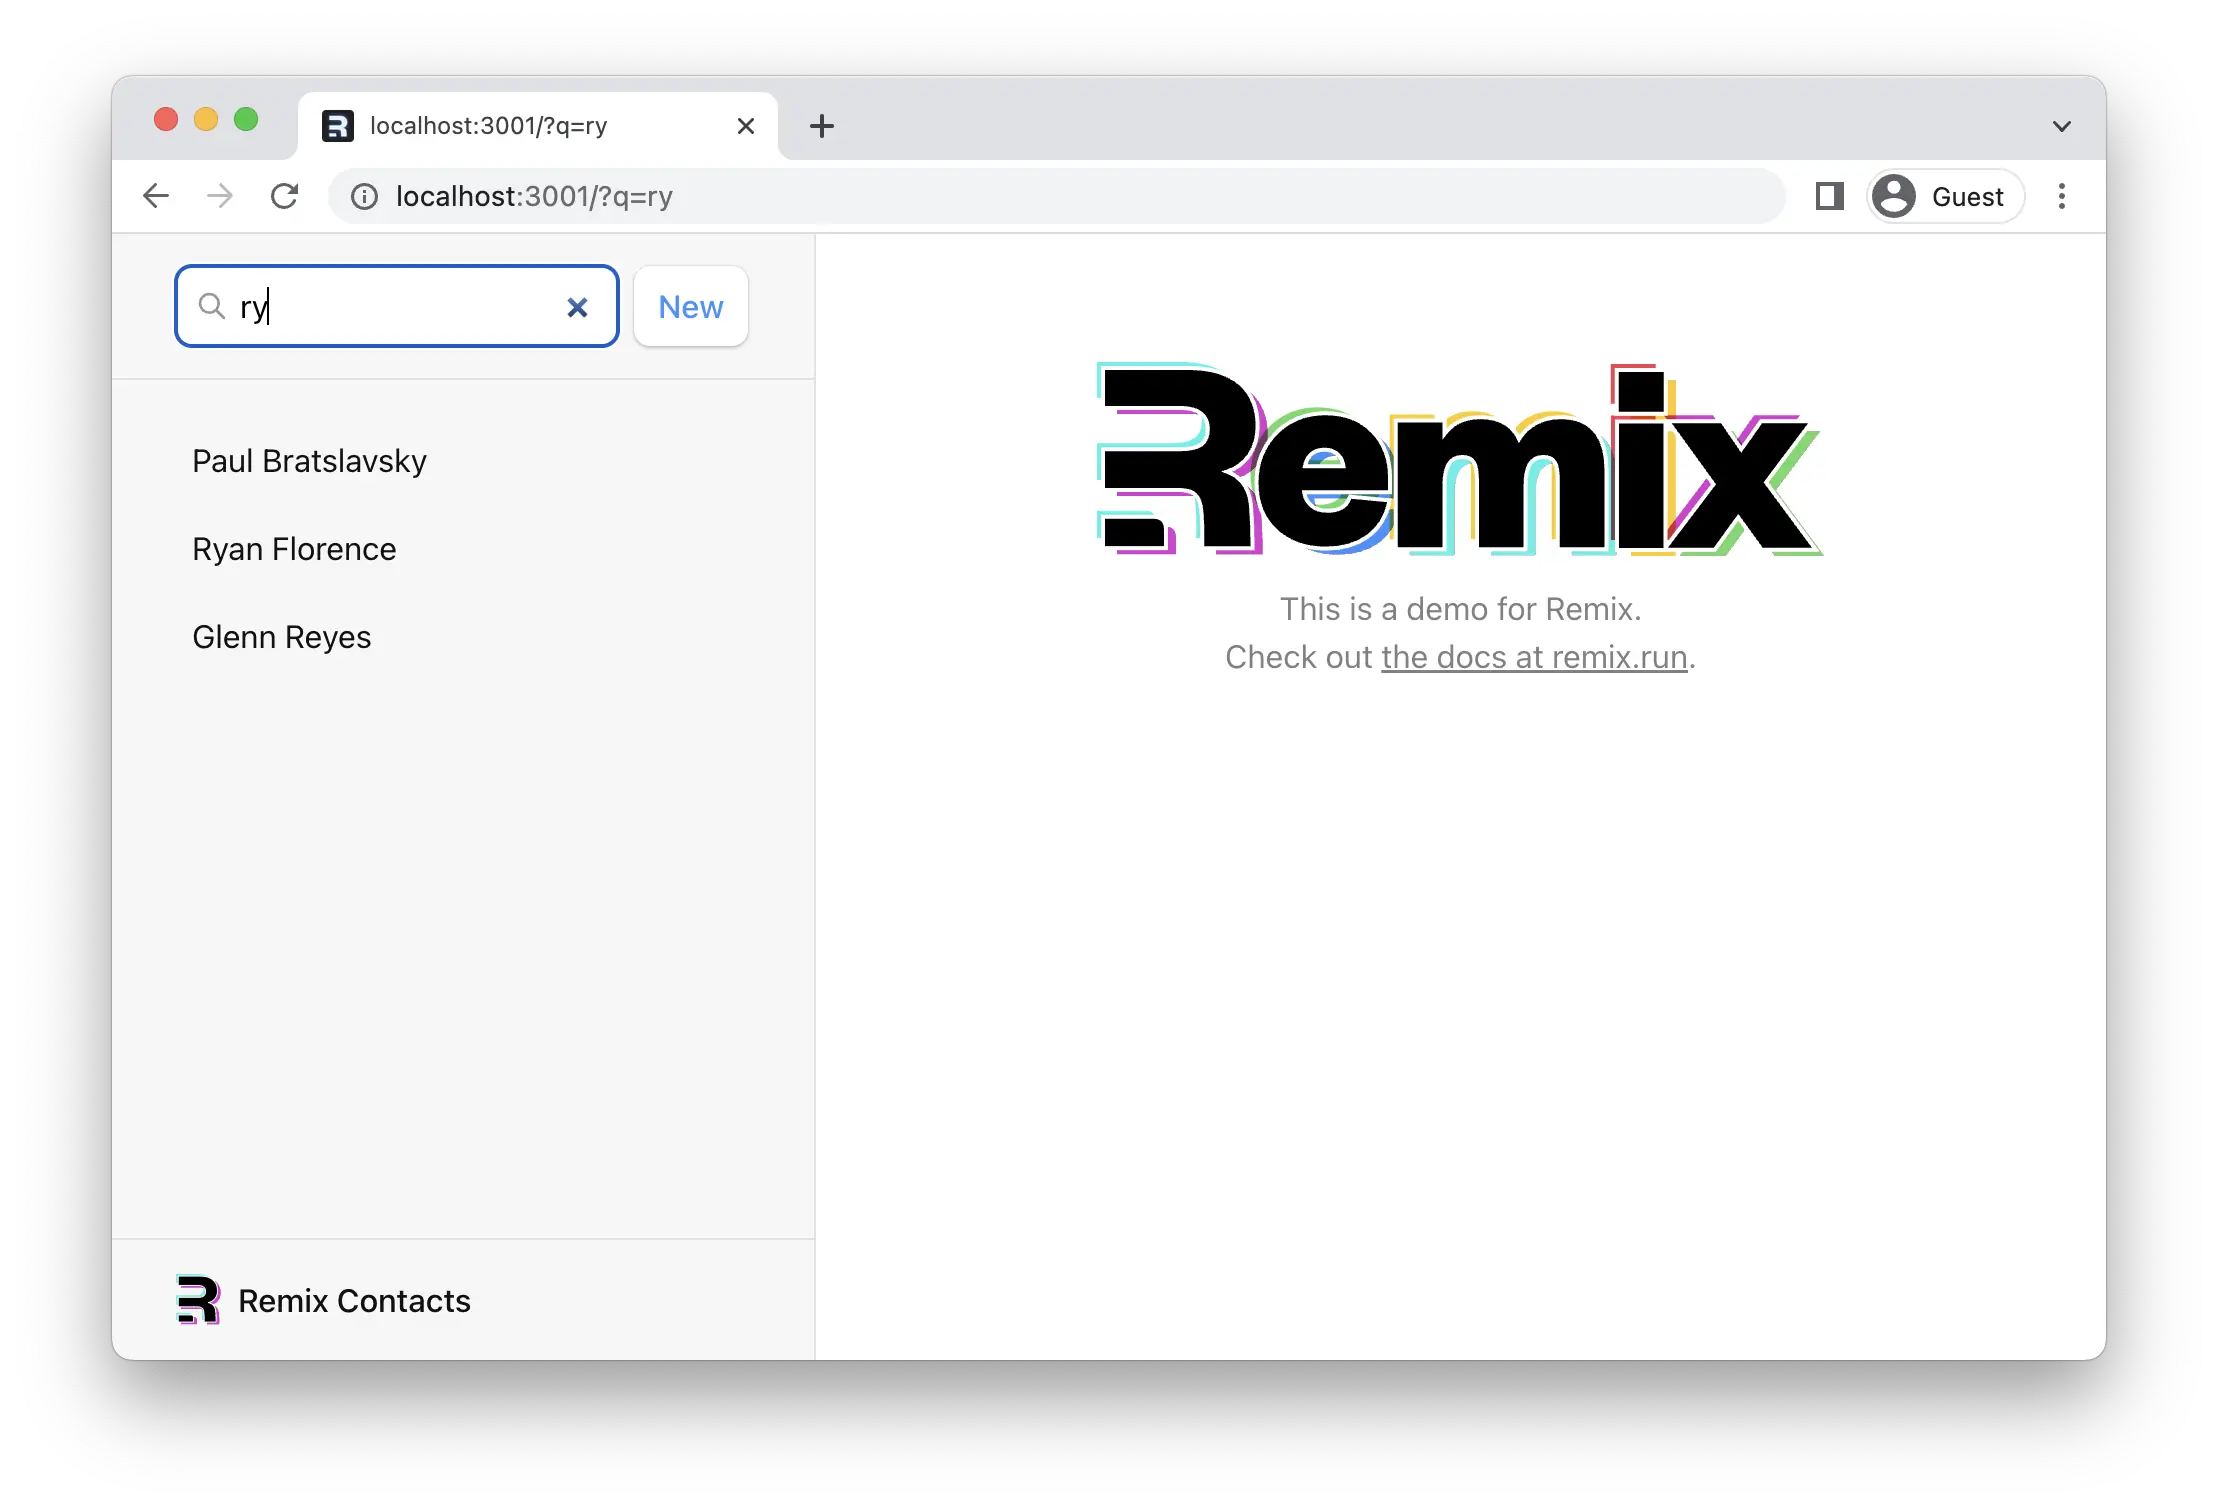
👉 Type a name into the search field and hit the enter key
Note the browser's URL now contains your query in the URL as URLSearchParams:
http://localhost:5173/?q=ryan
Since it's not <Form method="post">, Remix emulates the browser by serializing the FormData into the URLSearchParams instead of the request body.
loader functions have access to the search params from the request. Let's use it to filter the list:
👉 Filter the list if there are URLSearchParams
import type {
  LinksFunction,
  LoaderFunctionArgs,
} from "@remix-run/node";

// existing imports and exports

export const loader = async ({
  request,
}: LoaderFunctionArgs) => {
  const url = new URL(request.url);
  const q = url.searchParams.get("q");
  const contacts = await getContacts(q);
  return { contacts };
};

// existing code
Because this is a GET, not a POST, Remix does not call the action function. Submitting a GET form is the same as clicking a link: only the URL changes.
This also means it's a normal page navigation. You can click the back button to get back to where you were.
Synchronizing URLs to Form State
There are a couple of UX issues here that we can take care of quickly.
- If you click back after a search, the form field still has the value you entered even though the list is no longer filtered.
- If you refresh the page after searching, the form field no longer has the value in it, even though the list is filtered
In other words, the URL and our input's state are out of sync.
Let's solve (2) first and start the input with the value from the URL.
👉 Return q from your loader, set it as the input's default value
// existing imports and exports

export const loader = async ({
  request,
}: LoaderFunctionArgs) => {
  const url = new URL(request.url);
  const q = url.searchParams.get("q");
  const contacts = await getContacts(q);
  return { contacts, q };
};

export default function App() {
  const { contacts, q } = useLoaderData<typeof loader>();
  const navigation = useNavigation();

  return (
    <html lang="en">
      {/* existing elements */}
      <body>
        <div id="sidebar">
          {/* existing elements */}
          <div>
            <Form id="search-form" role="search">
              <input
                aria-label="Search contacts"
                defaultValue={q || ""}
                id="q"
                name="q"
                placeholder="Search"
                type="search"
              />
              {/* existing elements */}
            </Form>
            {/* existing elements */}
          </div>
          {/* existing elements */}
        </div>
        {/* existing elements */}
      </body>
    </html>
  );
}
The input field will show the query if you refresh the page after a search now.
Now for problem (1), clicking the back button and updating the input. We can bring in useEffect from React to manipulate the input's value in the DOM directly.
👉 Synchronize input value with the URLSearchParams
// existing imports
import { useEffect } from "react";

// existing imports and exports

export default function App() {
  const { contacts, q } = useLoaderData<typeof loader>();
  const navigation = useNavigation();

  useEffect(() => {
    const searchField = document.getElementById("q");
    if (searchField instanceof HTMLInputElement) {
      searchField.value = q || "";
    }
  }, [q]);

  // existing code
}
🤔 Shouldn't you use a controlled component and React State for this?
You could certainly do this as a controlled component. You will have more synchronization points, but it's up to you.
Expand this to see what it would look like
// We no longer need useEffect
import { useState } from "react";

// existing imports and exports

export default function App() {
  const { contacts, q } = useLoaderData<typeof loader>();
  const navigation = useNavigation();
  // the query now needs to be kept in state
  const [prevQ, setPrevQ] = useState(q);
  const [query, setQuery] = useState(q || "");

  // We can avoid using `useEffect` to synchronize the query
  // by using a separate piece of state to store the previous
  // value
  if (q !== prevQ) {
    setPrevQ(q);
    setQuery(q || "");
  }

  return (
    <html lang="en">
      {/* existing elements */}
      <body>
        <div id="sidebar">
          {/* existing elements */}
          <div>
            <Form id="search-form" role="search">
              <input
                aria-label="Search contacts"
                id="q"
                name="q"
                // synchronize user's input to component state
                onChange={(event) =>
                  setQuery(event.currentTarget.value)
                }
                placeholder="Search"
                type="search"
                // switched to `value` from `defaultValue`
                value={query}
              />
              {/* existing elements */}
            </Form>
            {/* existing elements */}
          </div>
          {/* existing elements */}
        </div>
        {/* existing elements */}
      </body>
    </html>
  );
}
Alright, you should now be able to click the back/forward/refresh buttons, and the input's value should be in sync with the URL and results.
Submitting Form's onChange
We've got a product decision to make here. Sometimes you want the user to submit the form to filter some results, other times you want to filter as the user types. We've already implemented the first, so let's see what it's like for the second.
We've seen useNavigate already, we'll use its cousin, useSubmit, for this.
// existing imports
import {
  Form,
  Links,
  Meta,
  NavLink,
  Outlet,
  Scripts,
  ScrollRestoration,
  useLoaderData,
  useNavigation,
  useSubmit,
} from "@remix-run/react";
// existing imports and exports

export default function App() {
  const { contacts, q } = useLoaderData<typeof loader>();
  const navigation = useNavigation();
  const submit = useSubmit();

  // existing code

  return (
    <html lang="en">
      {/* existing elements */}
      <body>
        <div id="sidebar">
          {/* existing elements */}
          <div>
            <Form
              id="search-form"
              onChange={(event) =>
                submit(event.currentTarget)
              }
              role="search"
            >
              {/* existing elements */}
            </Form>
            {/* existing elements */}
          </div>
          {/* existing elements */}
        </div>
        {/* existing elements */}
      </body>
    </html>
  );
}
As you type, the form is automatically submitted now!
Note the argument to submit. The submit function will serialize and submit any form you pass to it. We're passing in event.currentTarget. The currentTarget is the DOM node the event is attached to (the form).
Adding Search Spinner
In a production app, it's likely this search will be looking for records in a database that is too large to send all at once and filter client side. That's why this demo has some faked network latency.
Without any loading indicator, the search feels kinda sluggish. Even if we could make our database faster, we'll always have the user's network latency in the way and out of our control.
For a better user experience, let's add some immediate UI feedback for the search. We'll use useNavigation again.
👉 Add a variable to know if we're searching
// existing imports and exports

export default function App() {
  const { contacts, q } = useLoaderData<typeof loader>();
  const navigation = useNavigation();
  const submit = useSubmit();
  const searching =
    navigation.location &&
    new URLSearchParams(navigation.location.search).has(
      "q"
    );

  // existing code
}
When nothing is happening, navigation.location will be undefined, but when the user navigates it will be populated with the next location while data loads. Then we check if they're searching with location.search.
👉 Add classes to search form elements using the new searching state
// existing imports and exports

export default function App() {
  // existing code

  return (
    <html lang="en">
      {/* existing elements */}
      <body>
        <div id="sidebar">
          {/* existing elements */}
          <div>
            <Form
              id="search-form"
              onChange={(event) =>
                submit(event.currentTarget)
              }
              role="search"
            >
              <input
                aria-label="Search contacts"
                className={searching ? "loading" : ""}
                defaultValue={q || ""}
                id="q"
                name="q"
                placeholder="Search"
                type="search"
              />
              <div
                aria-hidden
                hidden={!searching}
                id="search-spinner"
              />
            </Form>
            {/* existing elements */}
          </div>
          {/* existing elements */}
        </div>
        {/* existing elements */}
      </body>
    </html>
  );
}
Bonus points, avoid fading out the main screen when searching:
// existing imports and exports

export default function App() {
  // existing code

  return (
    <html lang="en">
      {/* existing elements */}
      <body>
        {/* existing elements */}
        <div
          className={
            navigation.state === "loading" && !searching
              ? "loading"
              : ""
          }
          id="detail"
        >
          <Outlet />
        </div>
        {/* existing elements */}
      </body>
    </html>
  );
}
You should now have a nice spinner on the left side of the search input.

Managing the History Stack
Since the form is submitted for every keystroke, typing the characters "alex" and then deleting them with backspace results in a huge history stack 😂. We definitely don't want this:
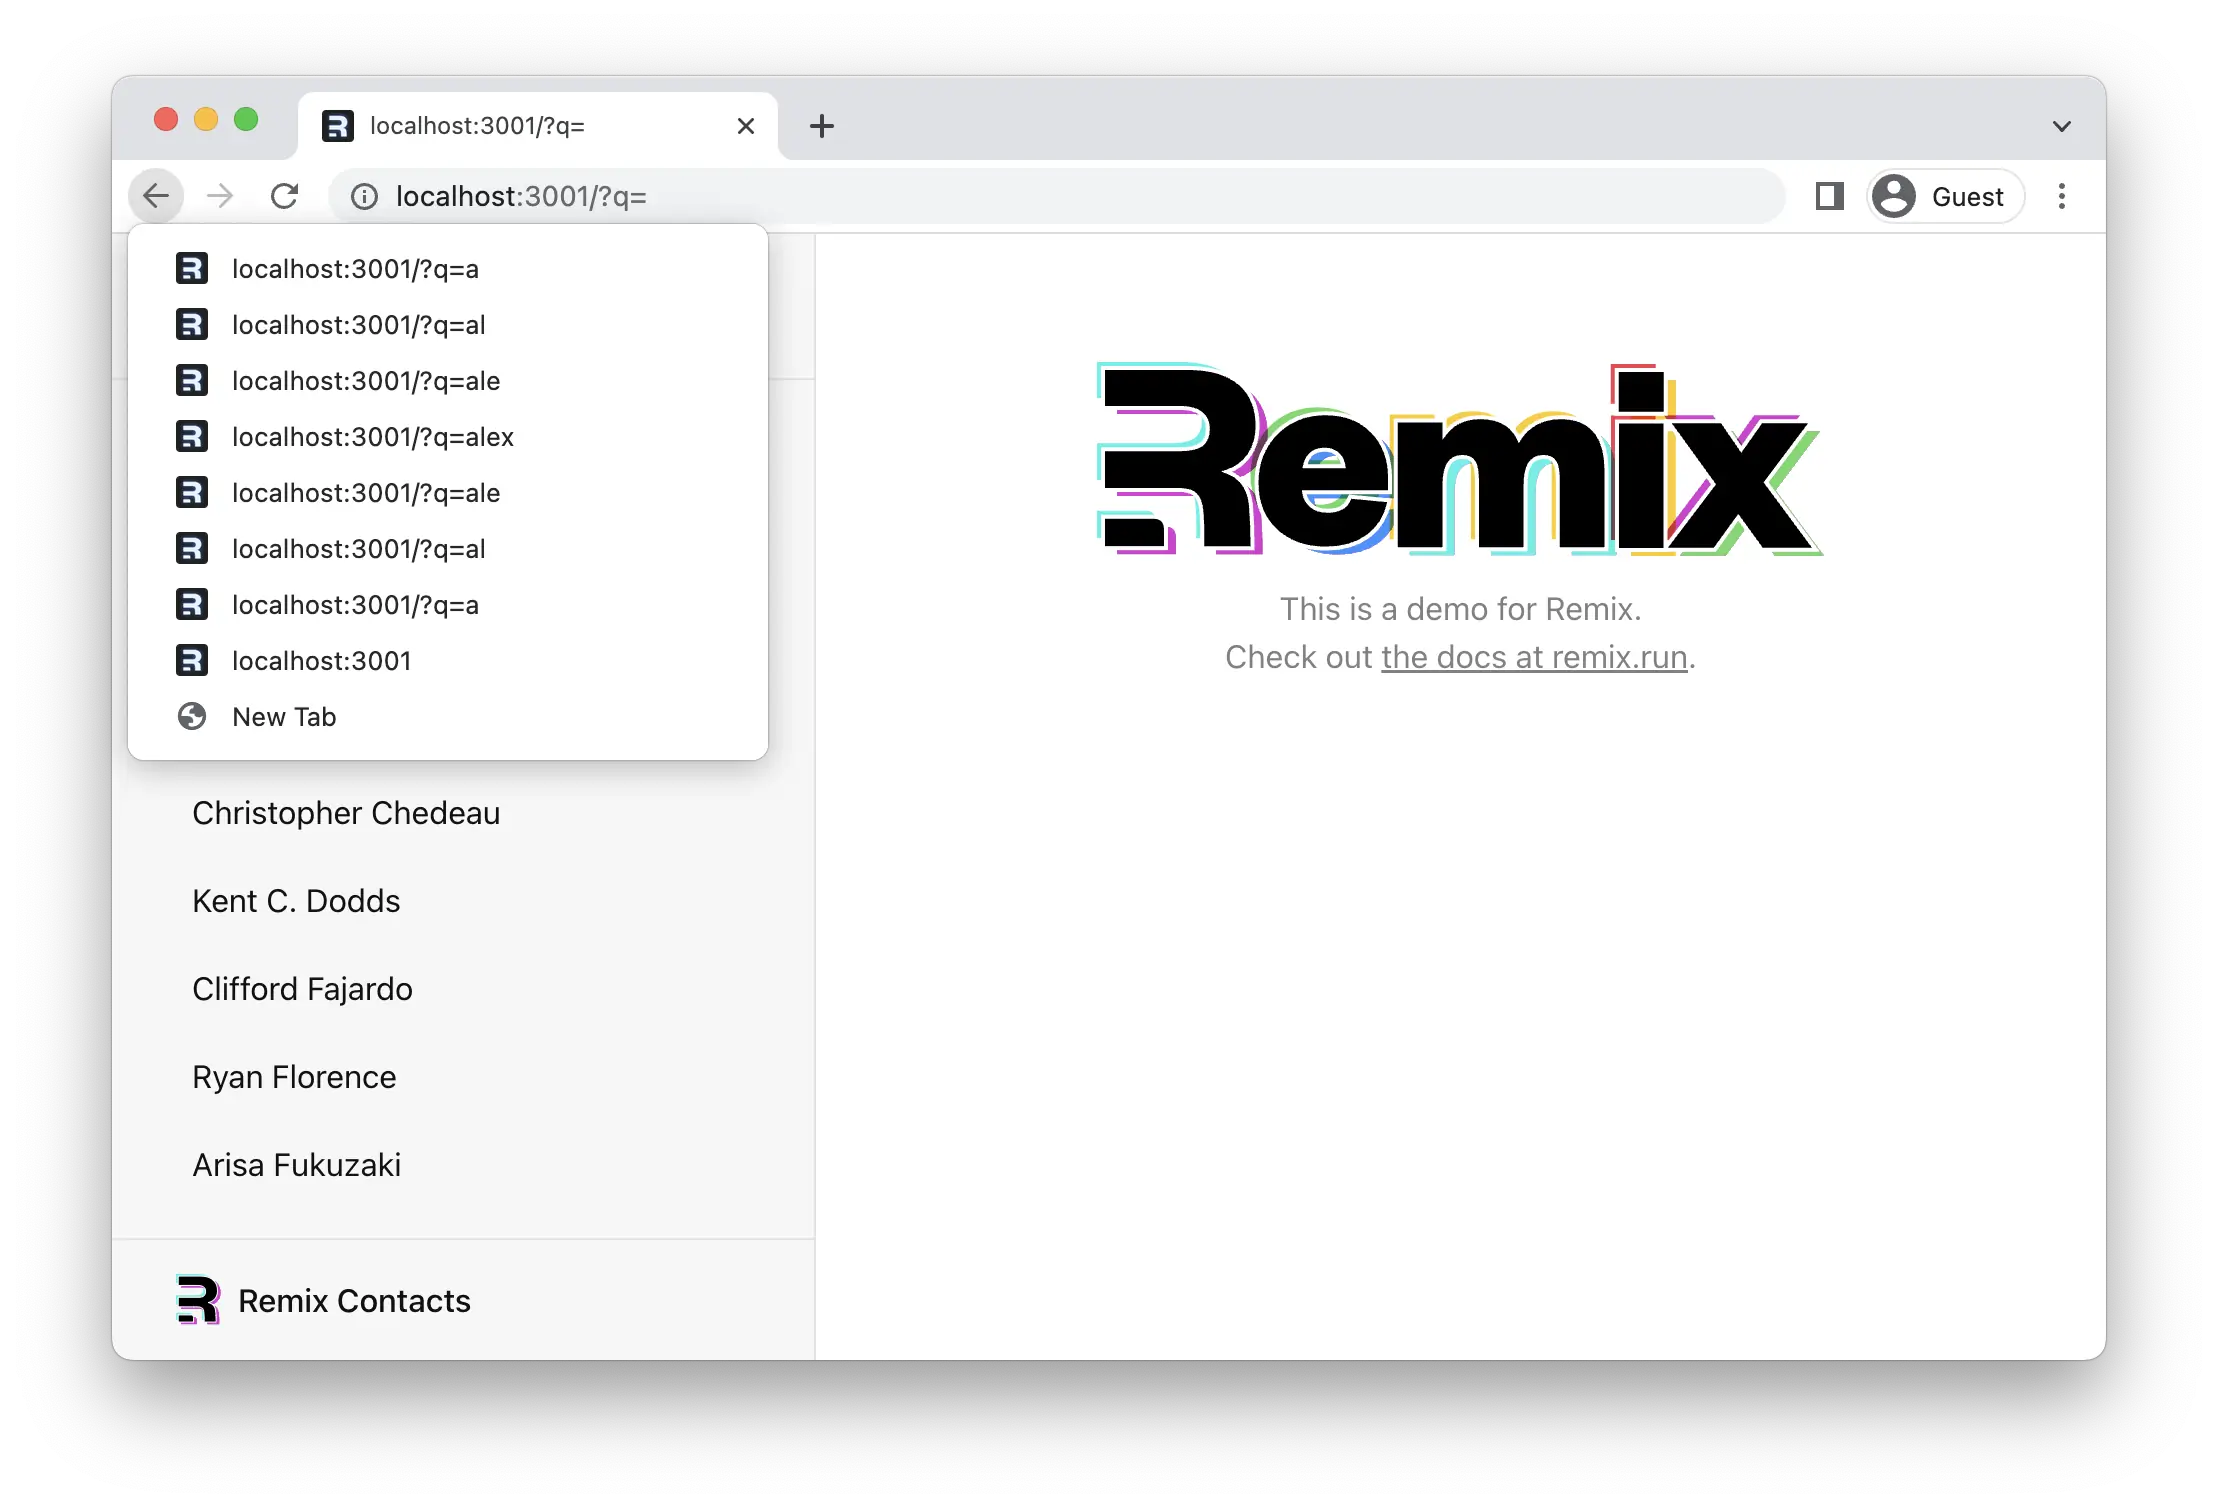
We can avoid this by replacing the current entry in the history stack with the next page instead of pushing into it.
👉 Use replace in submit
// existing imports and exports

export default function App() {
  // existing code

  return (
    <html lang="en">
      {/* existing elements */}
      <body>
        <div id="sidebar">
          {/* existing elements */}
          <div>
            <Form
              id="search-form"
              onChange={(event) => {
                const isFirstSearch = q === null;
                submit(event.currentTarget, {
                  replace: !isFirstSearch,
                });
              }}
              role="search"
            >
              {/* existing elements */}
            </Form>
            {/* existing elements */}
          </div>
          {/* existing elements */}
        </div>
        {/* existing elements */}
      </body>
    </html>
  );
}
After a quick check if this is the first search or not, we decide to replace it. Now the first search will add a new entry, but every keystroke after that will replace the current entry. Instead of clicking back seven times to remove the search, users only have to click back once.
Forms Without Navigation
So far all of our forms have changed the URL. While these user flows are common, it's equally common to want to submit a form without causing a navigation.
For these cases, we have useFetcher. It allows us to communicate with actions and loaders without causing a navigation.
The ★ button on the contact page makes sense for this. We aren't creating or deleting a new record, and we don't want to change pages. We simply want to change the data on the page we're looking at.
👉 Change the <Favorite> form to a fetcher form
// existing imports
import {
  Form,
  useFetcher,
  useLoaderData,
} from "@remix-run/react";
// existing imports and exports

// existing code

const Favorite: FunctionComponent<{
  contact: Pick<ContactRecord, "favorite">;
}> = ({ contact }) => {
  const fetcher = useFetcher();
  const favorite = contact.favorite;

  return (
    <fetcher.Form method="post">
      <button
        aria-label={
          favorite
            ? "Remove from favorites"
            : "Add to favorites"
        }
        name="favorite"
        value={favorite ? "false" : "true"}
      >
        {favorite ? "★" : "☆"}
      </button>
    </fetcher.Form>
  );
};
This form will no longer cause a navigation, but simply fetch to the action. Speaking of which ... this won't work until we create the action.
👉 Create the action
import type {
  ActionFunctionArgs,
  LoaderFunctionArgs,
} from "@remix-run/node";
// existing imports

import { getContact, updateContact } from "../data";
// existing imports

export const action = async ({
  params,
  request,
}: ActionFunctionArgs) => {
  invariant(params.contactId, "Missing contactId param");
  const formData = await request.formData();
  return updateContact(params.contactId, {
    favorite: formData.get("favorite") === "true",
  });
};

// existing code
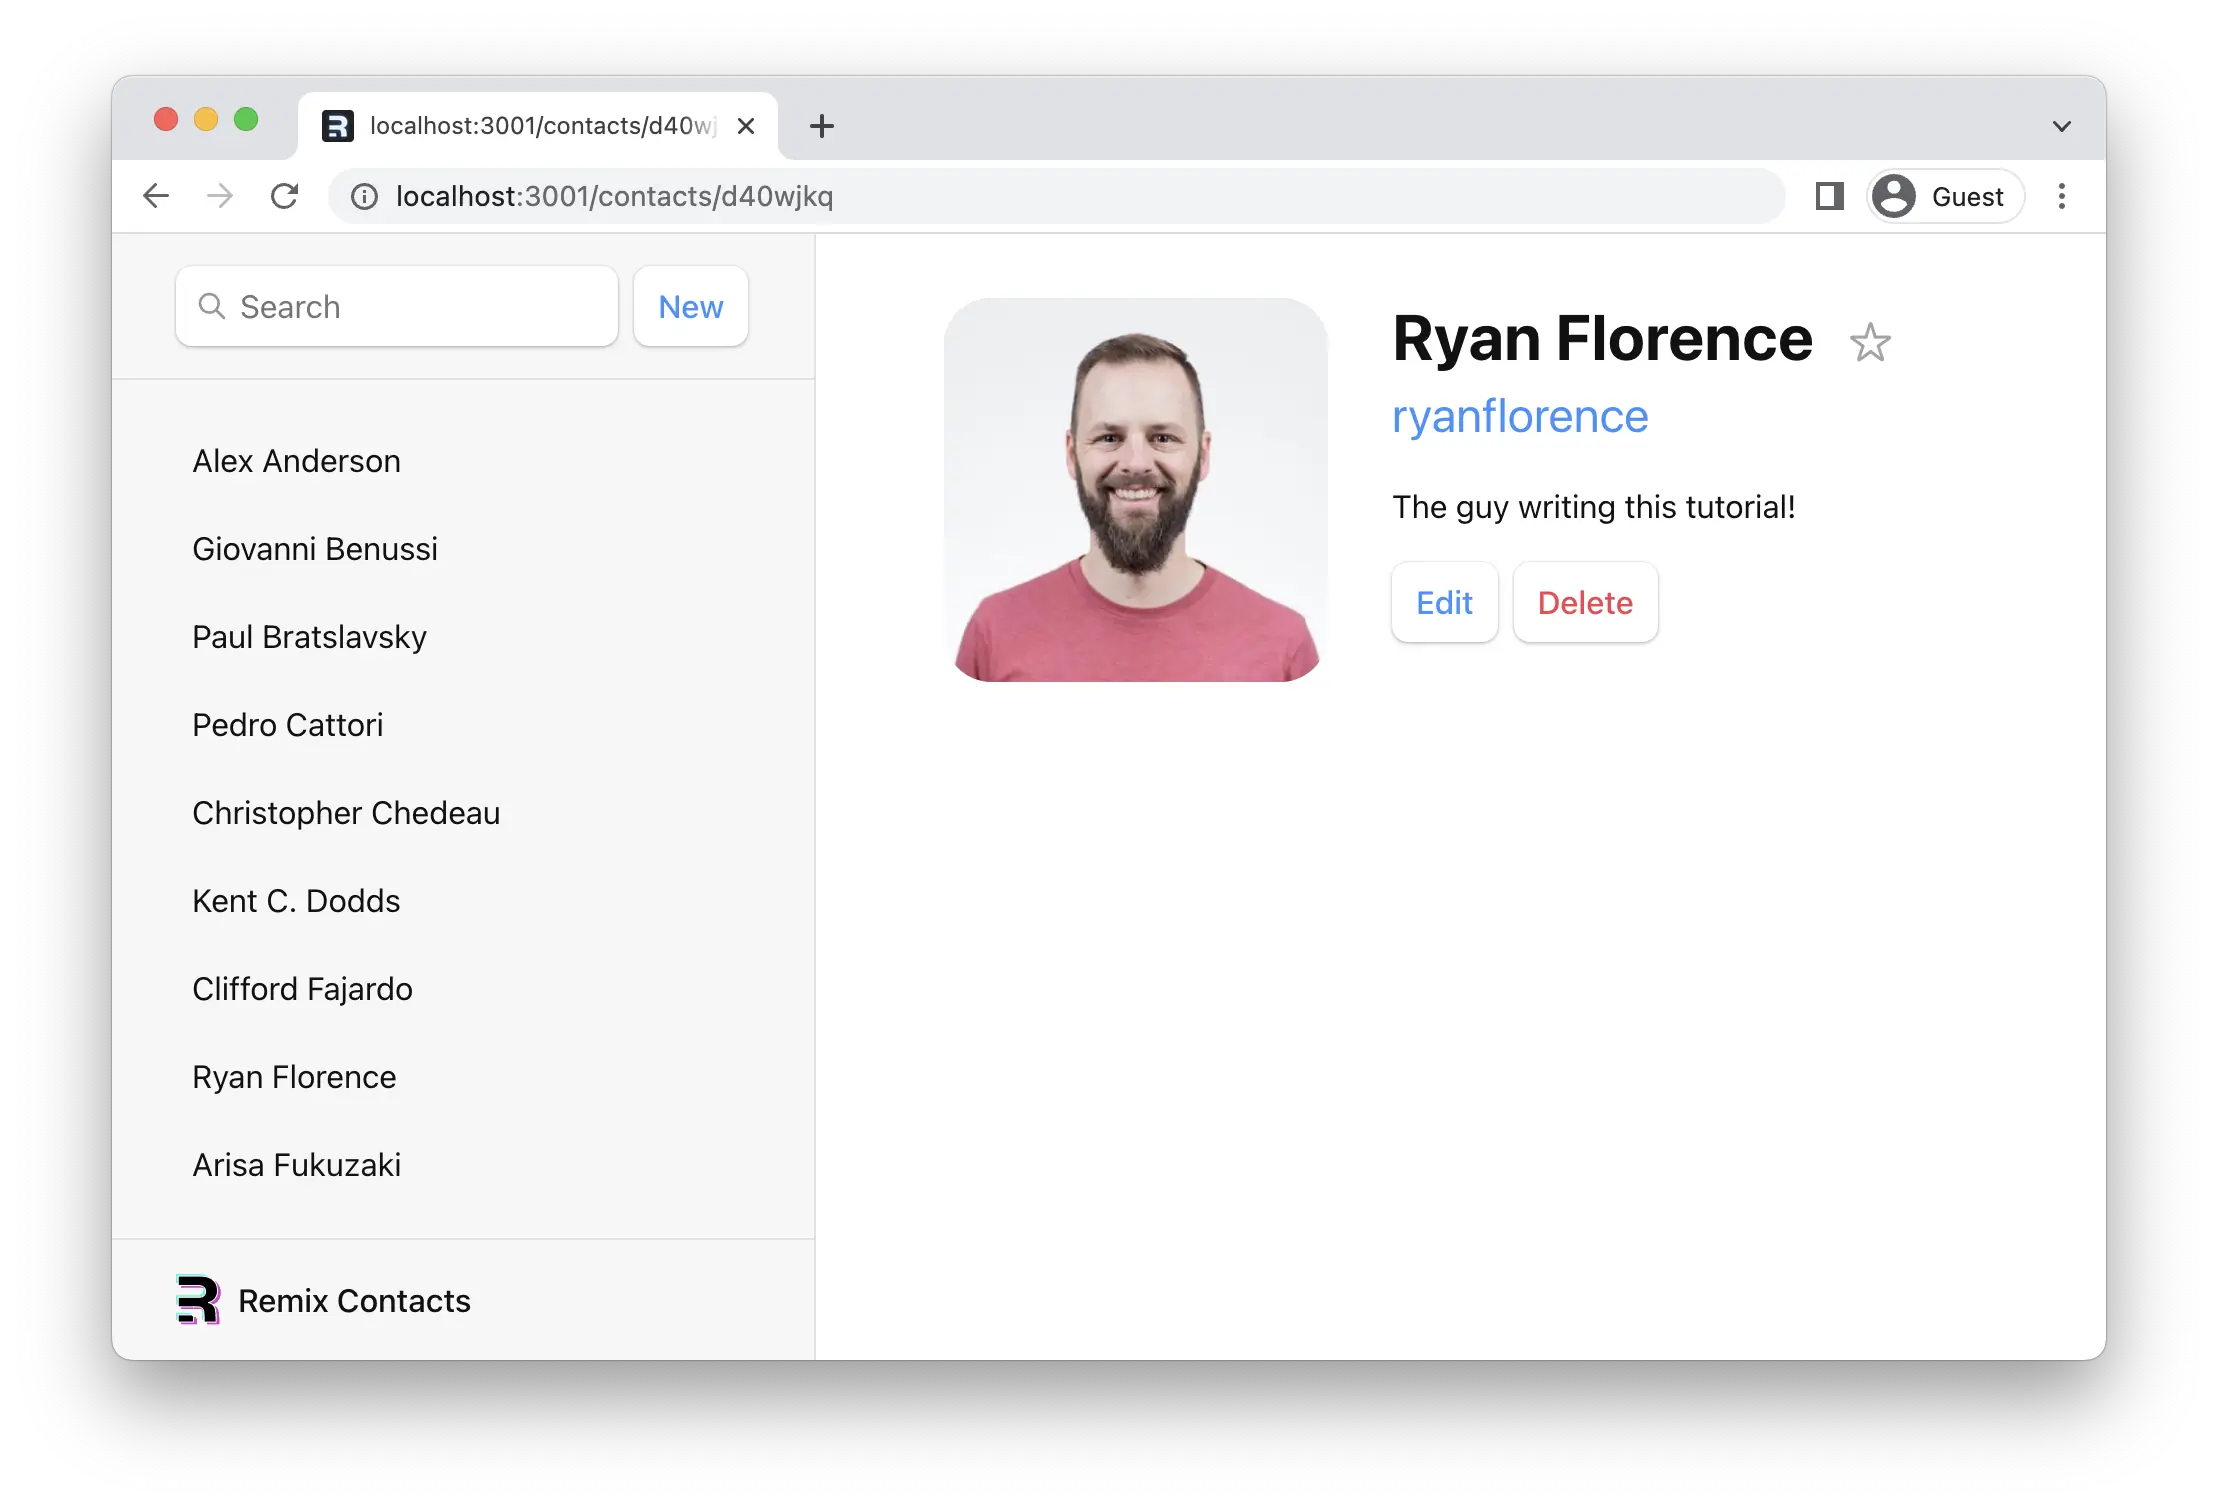
Alright, we're ready to click the star next to the user's name!
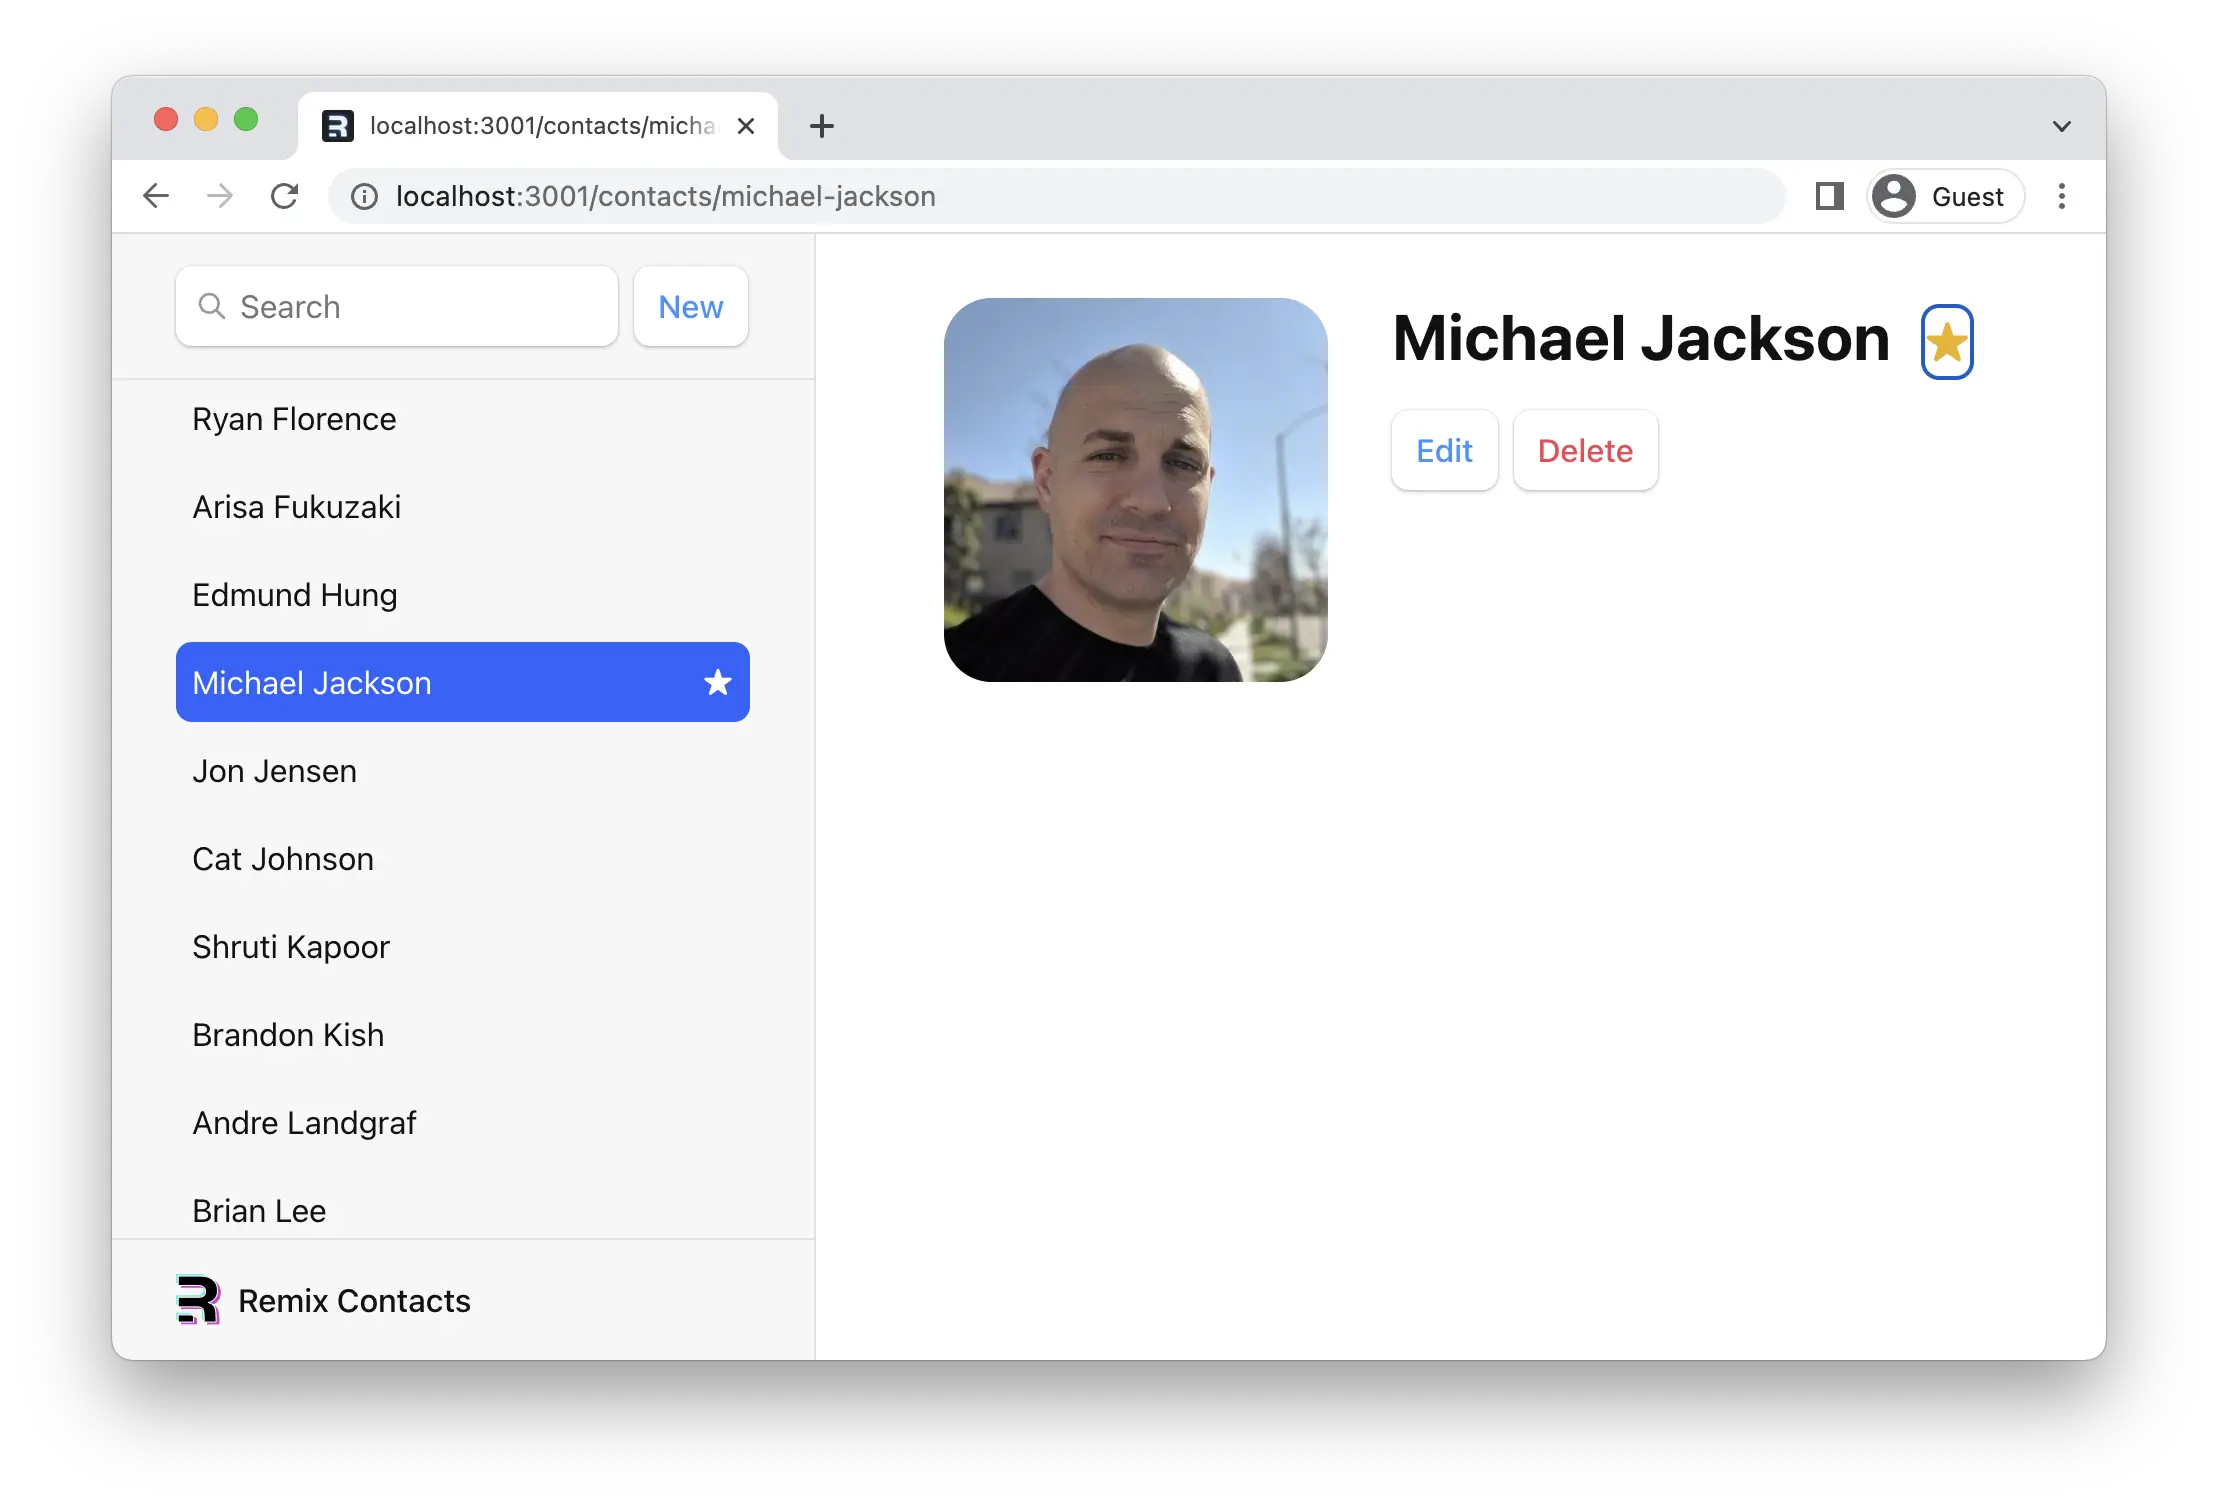
Check that out, both stars automatically update. Our new <fetcher.Form method="post"> works almost exactly like the <Form> we've been using: it calls the action and then all data is revalidated automatically — even your errors will be caught the same way.
There is one key difference, though, it's not a navigation, so the URL doesn't change, and the history stack is unaffected.
Optimistic UI
You probably noticed the app felt kind of unresponsive when we clicked the favorite button from the last section. Once again, we added some network latency because you're going to have it in the real world.
To give the user some feedback, we could put the star into a loading state with fetcher.state (a lot like navigation.state from before), but we can do something even better this time. We can use a strategy called "Optimistic UI".
The fetcher knows the FormData being submitted to the action, so it's available to you on fetcher.formData. We'll use that to immediately update the star's state, even though the network hasn't finished. If the update eventually fails, the UI will revert to the real data.
👉 Read the optimistic value from fetcher.formData
// existing code

const Favorite: FunctionComponent<{
  contact: Pick<ContactRecord, "favorite">;
}> = ({ contact }) => {
  const fetcher = useFetcher();
  const favorite = fetcher.formData
    ? fetcher.formData.get("favorite") === "true"
    : contact.favorite;

  return (
    <fetcher.Form method="post">
      <button
        aria-label={
          favorite
            ? "Remove from favorites"
            : "Add to favorites"
        }
        name="favorite"
        value={favorite ? "false" : "true"}
      >
        {favorite ? "★" : "☆"}
      </button>
    </fetcher.Form>
  );
};
Now the star immediately changes to the new state when you click it.
That's it! Thanks for giving Remix a try. We hope this tutorial gives you a solid start to build great user experiences. There's a lot more you can do, so make sure to check out all the APIs 😀